了解如何使用 Python 中的 PyOpenSSL 和 PDFNetPython3 库生成自签名证书并将其作为数字签名签署到 PDF 文件中,并且包含一些Python签名PDF文件示例。
一个数字签名添加到PDF文档就相当于纸质文件上的墨水签名,但前者是更安全的。
数字签名可保证 PDF 文档的完整性,并证明该文档未被未知人员修改。它可以取代你的手写签名,以加快几乎所有纸质驱动的手动签名流程并加快工作流程。
在本教程中,你将学习:
- 如何在 Python 中生成自签名证书。
- 如何在 Python 中为 PDF 文档添加数字签名。
Python如何签署数字签名到PDF文件?需要以下组件:
- PDFNetPython3:是PDFTron SDK的包装器。使用 PDFTron 组件,你可以构建可靠且快速的应用程序,这些应用程序可以跨各种操作系统查看、创建、打印、编辑和注释 PDF。开发人员使用 PDFTron SDK 来读取、编写和编辑与所有已发布版本的 PDF 规范(包括最新的ISO32000)兼容的 PDF 文档。PDFTron 不是免费软件,它提供两种类型的许可证,具体取决于你是在开发外部/商业产品还是内部解决方案。出于本教程的目的,我们将使用此 SDK 的免费试用版。
- pyOpenSSL:围绕 OpenSSL 库的 Python 包装器。OpenSSL 是许多产品、应用程序和供应商使用的流行安全库。
Python如何给PDF文件签名?本教程的目的是通过基于 Python 的模块开发一个基于命令行的轻量级实用程序,以便对位于特定路径下的一个或一组 PDF 文件进行数字签名。
相关: 如何在 Python 中为 PDF 文件加水印。
首先,让我们安装库:
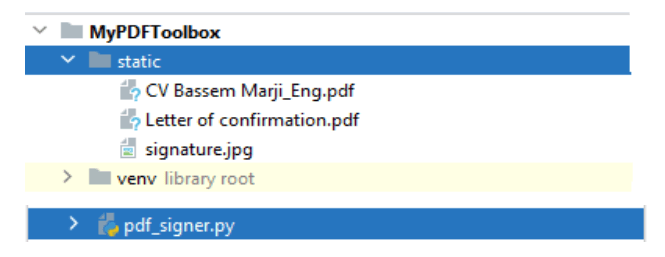
$ pip install PDFNetPython3==8.1.0 pyOpenSSL==20.0.1最后,我们的文件夹结构将如下所示:
 该
该signature.jpg文件代表样本签名:
 该
该"Letter of confirmation.pdf"文件表示要签名的示例 PDF 文件。
让我们开始吧,打开一个新的 Python 文件并命名它sign_pdf.py或其他什么:
# Import Libraries
import OpenSSL
import os
import time
import argparse
from PDFNetPython3.PDFNetPython import *
from typing import Tuple


def createKeyPair(type, bits):
    """
    Create a public/private key pair
    Arguments: Type - Key Type, must be one of TYPE_RSA and TYPE_DSA
               bits - Number of bits to use in the key (1024 or 2048 or 4096)
    Returns: The public/private key pair in a PKey object
    """
    pkey = OpenSSL.crypto.PKey()
    pkey.generate_key(type, bits)
    return pkey
上述函数创建了一个公钥/私钥对,以便在生成自签名证书以执行非对称加密时使用。
接下来,创建一个创建自签名证书的函数:
def create_self_signed_cert(pKey):
    """Create a self signed certificate. This certificate will not require to be signed by a Certificate Authority."""
    # Create a self signed certificate
    cert = OpenSSL.crypto.X509()
    # Common Name (e.g. server FQDN or Your Name)
    cert.get_subject().CN = "BASSEM MARJI"
    # Serial Number
    cert.set_serial_number(int(time.time() * 10))
    # Not Before
    cert.gmtime_adj_notBefore(0)  # Not before
    # Not After (Expire after 10 years)
    cert.gmtime_adj_notAfter(10 * 365 * 24 * 60 * 60)
    # Identify issue
    cert.set_issuer((cert.get_subject()))
    cert.set_pubkey(pKey)
    cert.sign(pKey, 'md5')  # or cert.sign(pKey, 'sha256')
    return cert
Python如何给PDF文件签名?此函数创建一个不需要由证书颁发机构签名的自签名证书。此函数将为证书分配以下属性:
- 通用名称:BASSEM MARJI。
- 序列号:取决于时间函数的随机数。
- Not After:10 年后到期。
Python签名PDF文件示例:现在让我们创建一个使用这两个函数来生成证书的函数:
def load():
    """Generate the certificate"""
    summary = {}
    summary['OpenSSL Version'] = OpenSSL.__version__
    # Generating a Private Key...
    key = createKeyPair(OpenSSL.crypto.TYPE_RSA, 1024)
    # PEM encoded
    with open('.\static\private_key.pem', 'wb') as pk:
        pk_str = OpenSSL.crypto.dump_privatekey(OpenSSL.crypto.FILETYPE_PEM, key)
        pk.write(pk_str)
        summary['Private Key'] = pk_str
    # Done - Generating a private key...
    # Generating a self-signed client certification...
    cert = create_self_signed_cert(pKey=key)
    with open('.\static\certificate.cer', 'wb') as cer:
        cer_str = OpenSSL.crypto.dump_certificate(
            OpenSSL.crypto.FILETYPE_PEM, cert)
        cer.write(cer_str)
        summary['Self Signed Certificate'] = cer_str
    # Done - Generating a self-signed client certification...
    # Generating the public key...
    with open('.\static\public_key.pem', 'wb') as pub_key:
        pub_key_str = OpenSSL.crypto.dump_publickey(
            OpenSSL.crypto.FILETYPE_PEM, cert.get_pubkey())
        #print("Public key = ",pub_key_str)
        pub_key.write(pub_key_str)
        summary['Public Key'] = pub_key_str
    # Done - Generating the public key...
    # Take a private key and a certificate and combine them into a PKCS12 file.
    # Generating a container file of the private key and the certificate...
    p12 = OpenSSL.crypto.PKCS12()
    p12.set_privatekey(key)
    p12.set_certificate(cert)
    open('.\static\container.pfx', 'wb').write(p12.export())
    # You may convert a PKSC12 file (.pfx) to a PEM format
    # Done - Generating a container file of the private key and the certificate...
    # To Display A Summary
    print("## Initialization Summary ##################################################")
    print("\n".join("{}:{}".format(i, j) for i, j in summary.items()))
    print("############################################################################")
    return True
该函数执行以下操作:
- 创建公钥/私钥对。
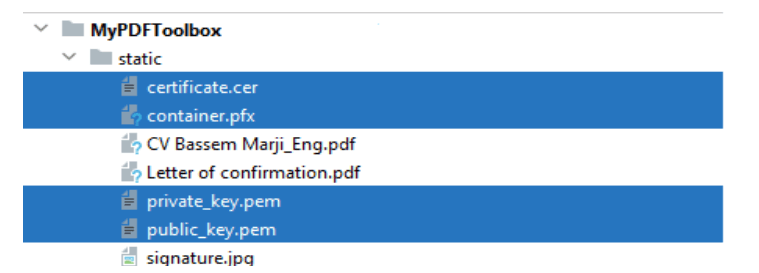
- 将私钥存储在文件夹
"private_key.pem"下的static文件中。 - 生成自签名证书并保存到文件夹
"certificate.cer"下的static文件中。 - 将公钥保存在文件夹
"public_key.pem"下的static文件中。 - 生成一个包含
"container.pfx"私钥和证书的容器文件,并将其放在static文件夹下。
请注意,不应在控制台中打印私钥。但是,出于演示目的,它包含在摘要字典(将被打印)中,如果你对此很认真,请确保从控制台输出中删除私钥。
Python如何签署数字签名到PDF文件?现在我们有了生成证书的核心函数,让我们创建一个对PDF文件进行签名的函数:
def sign_file(input_file: str, signatureID: str, x_coordinate: int,
            y_coordinate: int, pages: Tuple = None, output_file: str = None
              ):
    """Sign a PDF file"""
    # An output file is automatically generated with the word signed added at its end
    if not output_file:
        output_file = (os.path.splitext(input_file)[0]) + "_signed.pdf"
    # Initialize the library
    PDFNet.Initialize()
    doc = PDFDoc(input_file)
    # Create a signature field
    sigField = SignatureWidget.Create(doc, Rect(
        x_coordinate, y_coordinate, x_coordinate+100, y_coordinate+50), signatureID)
    # Iterate throughout document pages
    for page in range(1, (doc.GetPageCount() + 1)):
        # If required for specific pages
        if pages:
            if str(page) not in pages:
                continue
        pg = doc.GetPage(page)
        # Create a signature text field and push it on the page
        pg.AnnotPushBack(sigField)
    # Signature image
    sign_filename = os.path.dirname(
        os.path.abspath(__file__)) + "\static\signature.jpg"
    # Self signed certificate
    pk_filename = os.path.dirname(
        os.path.abspath(__file__)) + "\static\container.pfx"
    # Retrieve the signature field.
    approval_field = doc.GetField(signatureID)
    approval_signature_digsig_field = DigitalSignatureField(approval_field)
    # Add appearance to the signature field.
    img = Image.Create(doc.GetSDFDoc(), sign_filename)
    found_approval_signature_widget = SignatureWidget(
        approval_field.GetSDFObj())
    found_approval_signature_widget.CreateSignatureAppearance(img)
    # Prepare the signature and signature handler for signing.
    approval_signature_digsig_field.SignOnNextSave(pk_filename, '')
    # The signing will be done during the following incremental save operation.
    doc.Save(output_file, SDFDoc.e_incremental)
    # Develop a Process Summary
    summary = {
        "Input File": input_file, "Signature ID": signatureID,
        "Output File": output_file, "Signature File": sign_filename,
        "Certificate File": pk_filename
    }
    # Printing Summary
    print("## Summary ########################################################")
    print("\n".join("{}:{}".format(i, j) for i, j in summary.items()))
    print("###################################################################")
return True该sign_file()函数执行以下操作:
- 遍历输入 PDF 文件的页面。
- 将签名小部件插入到此文件的选定页面的特定位置。
- 添加签名图像并使用自签名证书对文件进行签名。
确保static文件夹下有证书(稍后我们将看到如何生成它)。
或者,以下函数可用于对特定文件夹中的所有 PDF 文件进行签名:
def sign_folder(**kwargs):
    """Sign all PDF Files within a specified path"""
    input_folder = kwargs.get('input_folder')
    signatureID = kwargs.get('signatureID')
    pages = kwargs.get('pages')
    x_coordinate = int(kwargs.get('x_coordinate'))
    y_coordinate = int(kwargs.get('y_coordinate'))
    # Run in recursive mode
    recursive = kwargs.get('recursive')
    # Loop though the files within the input folder.
    for foldername, dirs, filenames in os.walk(input_folder):
        for filename in filenames:
            # Check if pdf file
            if not filename.endswith('.pdf'):
                continue
            # PDF File found
            inp_pdf_file = os.path.join(foldername, filename)
            print("Processing file =", inp_pdf_file)
            # Compress Existing file
            sign_file(input_file=inp_pdf_file, signatureID=signatureID, x_coordinate=x_coordinate,
                      y_coordinate=y_coordinate, pages=pages, output_file=None)
        if not recursive:
            break
Python签名PDF文件示例:此功能旨在对特定文件夹的 PDF 文件进行签名。它根据recursive参数的值是否递归地遍历指定文件夹的文件,并逐个处理这些文件。它接受以下参数:
input_folder:包含要处理的 PDF 文件的文件夹的路径。signatureID:要创建的签名小部件的标识符。x_coordinate和y_coordinate:表示签名位置的坐标。pages:要签名的页面范围。recursive:是否通过遍历子文件夹递归地运行此过程。
好的,现在我们拥有了一切,让我们编写必要的代码来解析命令行参数:
def is_valid_path(path):
    """Validates the path inputted and checks whether it is a file path or a folder path"""
    if not path:
        raise ValueError(f"Invalid Path")
    if os.path.isfile(path):
        return path
    elif os.path.isdir(path):
        return path
    else:
        raise ValueError(f"Invalid Path {path}")


def parse_args():
    """Get user command line parameters"""
    parser = argparse.ArgumentParser(description="Available Options")
    parser.add_argument('-l', '--load', dest='load', action="store_true",
                        help="Load the required configurations and create the certificate")
    parser.add_argument('-i', '--input_path', dest='input_path', type=is_valid_path,
                        help="Enter the path of the file or the folder to process")
    parser.add_argument('-s', '--signatureID', dest='signatureID',
                        type=str, help="Enter the ID of the signature")
    parser.add_argument('-p', '--pages', dest='pages', type=tuple,
                        help="Enter the pages to consider e.g.: [1,3]")
    parser.add_argument('-x', '--x_coordinate', dest='x_coordinate',
                        type=int, help="Enter the x coordinate.")
    parser.add_argument('-y', '--y_coordinate', dest='y_coordinate',
                        type=int, help="Enter the y coordinate.")
    path = parser.parse_known_args()[0].input_path
    if path and os.path.isfile(path):
        parser.add_argument('-o', '--output_file', dest='output_file',
                            type=str, help="Enter a valid output file")
    if path and os.path.isdir(path):
        parser.add_argument('-r', '--recursive', dest='recursive', default=False, type=lambda x: (
            str(x).lower() in ['true', '1', 'yes']), help="Process Recursively or Non-Recursively")
    args = vars(parser.parse_args())
    # To Display The Command Line Arguments
    print("## Command Arguments #################################################")
    print("\n".join("{}:{}".format(i, j) for i, j in args.items()))
    print("######################################################################")
return args该is_valid_path()函数验证作为参数输入的路径并检查它是文件还是目录。
Python如何给PDF文件签名?该parse_args()函数为用户在运行此实用程序时指定的命令行参数定义并设置适当的约束。我将在下文中描述定义的参数:
--load或-l:通过生成自签名证书来初始化配置设置。此步骤应执行一次或根据需要执行。--input_pathor-i:用于输入要处理的文件或文件夹的路径,该参数与is_valid_path()之前定义的函数相关联。--signatureID或-s:分配给签名小部件的标识符。(以防多个签名者需要签署同一个 PDF 文档)。--pages或-p:要签署的页面。--x_coordinateor-x和--y_coordinateor-y:指定签名在页面上的位置。--output_file或-o:输出文件的路径。填写此参数受限于选择文件作为输入,而不是目录。--recursiveor-r:是否递归处理文件夹。填写此参数受目录选择的限制。
现在编写主要代码:
if __name__ == '__main__':
    # Parsing command line arguments entered by user
    args = parse_args()
    if args['load'] == True:
        load()
    else:
        # If File Path
        if os.path.isfile(args['input_path']):
            sign_file(
                input_file=args['input_path'], signatureID=args['signatureID'],
                x_coordinate=int(args['x_coordinate']), y_coordinate=int(args['y_coordinate']),
                pages=args['pages'], output_file=args['output_file']
            )
        # If Folder Path
        elif os.path.isdir(args['input_path']):
            # Process a folder
            sign_folder(
                input_folder=args['input_path'], signatureID=args['signatureID'],
                x_coordinate=int(args['x_coordinate']), y_coordinate=int(args['y_coordinate']),
                pages=args['pages'], recursive=args['recursive']
            )
以上代表我们程序的主要功能,它根据加载参数或选择的路径调用相应的功能。
让我们测试我们的程序:
首先,让我们通过--help查看可用的命令行参数来传递:
$ python sign_pdf.py --help输出:
usage: sign_pdf.py [-h] [-l] [-i INPUT_PATH] [-s SIGNATUREID] [-p PAGES] [-x X_COORDINATE] [-y Y_COORDINATE]

Available Options

optional arguments:
  -h, --help            show this help message and exit
  -l, --load            Load the required configurations and create the certificate
  -i INPUT_PATH, --input_path INPUT_PATH
                        Enter the path of the file or the folder to process
  -s SIGNATUREID, --signatureID SIGNATUREID
                        Enter the ID of the signature
  -p PAGES, --pages PAGES
                        Enter the pages to consider e.g.: [1,3]
  -x X_COORDINATE, --x_coordinate X_COORDINATE
                        Enter the x coordinate.
  -y Y_COORDINATE, --y_coordinate Y_COORDINATE
                        Enter the y coordinate.
好,我们先生成一个自签名证书:
$ python sign_pdf.py --loadPython签名PDF文件示例:执行后,你会注意到在文件static夹下创建了相关文件:
 此外,你将在控制台上概述以下摘要:
## Command Arguments #################################################
load:True
input_path:None
signatureID:None
pages:None
x_coordinate:None
y_coordinate:None
######################################################################
## Initialization Summary ##################################################
OpenSSL Version:20.0.1
Private Key:b'-----BEGIN PRIVATE KEY-----\nMIICdwIBADANBgkqhkiG9w0BAQEFAASCAmEwggJdAgEAAoGBAM5HRS/5iLztVPxp\nnKUpjrECxVgqH+/BFh5A8v7KJcUsHY6ht6yL3D+vXxgiv170pOml2tGmW3zmvL/j\nEkWI/duMSyvPjc03SUp6rQqCnjw/dG2tSsOhzC51WwI8+bwDrdhNZ7x0UEdleeQw\n5NtwQ6MqwiLNLhJLT8V/dtVsK/LxAgMBAAECgYEAglt31cGUMBCrzHfRjm6cxjBC\nFl1IoXMcTzIsXefRxrECXMjGEjywi26AYfhTh+aC8UTm6+Z9mokWbw1I1rij85/y\nvx4CTSGFAkMGAzmRTkmliPZoQDUxjr2XmSZaRhipo0atLY5dQYhQcINXq80lLAxZ\nsS3Tl7mxnssRo0hcHCECQQDyTVQEE5YLKpAsLWYRqMP3L2EDKNmySycIvVKh9lKB\nSlaHWzUfdHgzONcTA5Egd2CQchifPLx9KrykkusXs4knAkEA2fCYpKaaDDY+CjUI\nrY5RsYYoh5v2tZZ3PB3ElbN5afZY+dHa+mXsI6eBZgaUmsHeT0/OyymfsxZk//mI\n85pCJwJBAI54h4kqFxSTv1gqjZSenjOO6UUZVP/wDpCl+ZuAIb0h/8TxDUhkjHTZ\n3CSy+TeU2fO1EuM2rEIQygEe3hr+lwsCQFMCgwFju5UfK+4zWQTSCme1k8ZjL0rm\n7q9lHzVt0Lb9b9JnjiKFo7XI3U6A/yUa5pQK79cOGZfa1clxwCoY/U0CQBu4vATn\nyWVfp6lgLgY9T9FsCp7wPIRJJA1sUfhDvNeNt7WK6ynhVDaD0bZ+lX0sYG2RxI3m\nVSgAaAyqkMcYl5Q=\n-----END PRIVATE KEY-----\n'
Self Signed Certificate:b'-----BEGIN CERTIFICATE-----\nMIIBoTCCAQoCBQPMisZRMA0GCSqGSIb3DQEBBAUAMBcxFTATBgNVBAMMDEJBU1NF\nTSBNQVJKSTAeFw0yMTA5MTQyMTI3NDhaFw0zMTA5MTIyMTI3NDhaMBcxFTATBgNV\nBAMMDEJBU1NFTSBNQVJKSTCBnzANBgkqhkiG9w0BAQEFAAOBjQAwgYkCgYEAzkdF\nL/mIvO1U/GmcpSmOsQLFWCof78EWHkDy/solxSwdjqG3rIvcP69fGCK/XvSk6aXa\n0aZbfOa8v+MSRYj924xLK8+NzTdJSnqtCoKePD90ba1Kw6HMLnVbAjz5vAOt2E1n\nvHRQR2V55DDk23BDoyrCIs0uEktPxX921Wwr8vECAwEAATANBgkqhkiG9w0BAQQF\nAAOBgQBLqfxOdXkXO2nubqSTdLEZYKyN4L+BxlYm2ZuG8ki0tAOrAAVIcmCM6QYf\n0oWURShZko+a6YP5f4UmZh1DVO7WnnBOytDf+f+n3SErw5YEkfbCDQp5MSjz+79N\nvJtQOPr3RjtyuDFWvNlcit2q6JW2lsmfD2+CdG7iSbiKLC8Bag==\n-----END CERTIFICATE-----\n'
Public Key:b'-----BEGIN PUBLIC KEY-----\nMIGfMA0GCSqGSIb3DQEBAQUAA4GNADCBiQKBgQDOR0Uv+Yi87VT8aZylKY6xAsVY\nKh/vwRYeQPL+yiXFLB2Oobesi9w/r18YIr9e9KTppdrRplt85ry/4xJFiP3bjEsr\nz43NN0lKeq0Kgp48P3RtrUrDocwudVsCPPm8A63YTWe8dFBHZXnkMOTbcEOjKsIi\nzS4SS0/Ff3bVbCvy8QIDAQAB\n-----END PUBLIC KEY-----\n'
############################################################################
Python如何签署数字签名到PDF文件?如你所见,私钥和公钥以及证书都已成功生成。再次,如前所述。如果你使用此代码,你应该从摘要字典中排除私钥,这样它就不会被打印到控制台。
现在让我们签署名为"Letter of confirmation.pdf"static 文件夹下的文档:
$ python sign_pdf.py -i ".\static\Letter of confirmation.pdf" -s "BM" -x 330 -y 280控制台上将显示以下摘要:
## Command Arguments #################################################
load:False
input_path:static\Letter of confirmation.pdf
signatureID:BM
pages:None
x_coordinate:330
y_coordinate:280
output_file:None
######################################################################

PDFNet is running in demo mode.
Permission: read
Permission: write
## Summary ########################################################
Input File:static\Letter of confirmation.pdf
Signature ID:BM
Output File:static\Letter of confirmation_signed.pdf
Signature File:C:\pythoncode-tutorials\handling-pdf-files\pdf-signer\static\signature.jpg
Certificate File:C:\pythoncode-tutorials\handling-pdf-files\pdf-signer\static\container.pfx
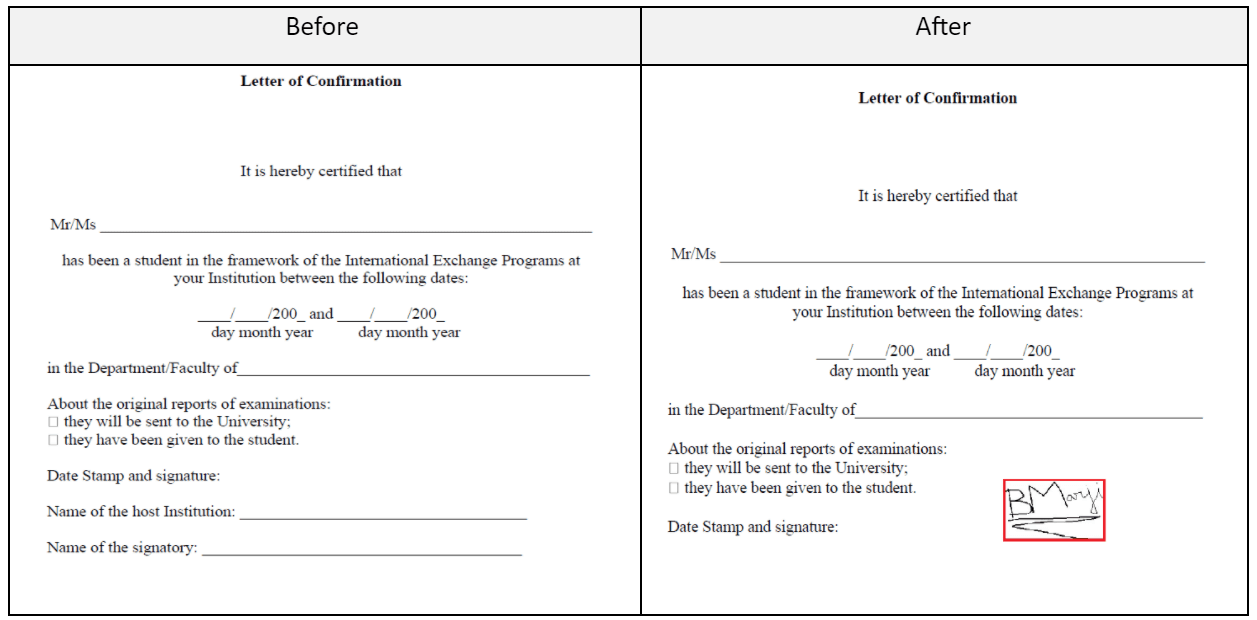
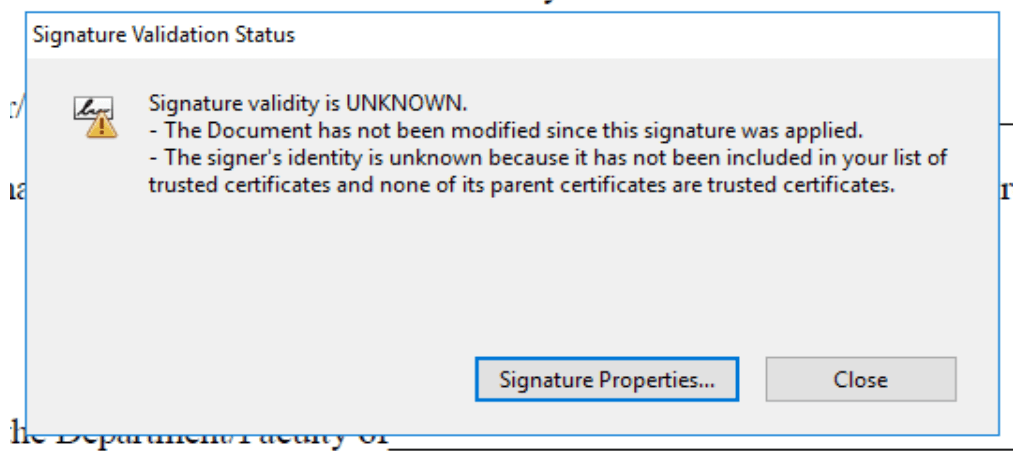
###################################################################该文件将更新"Letter of confirmation_signed.pdf"如下: 当你单击突出显示的签名字段时,你会注意到以下显示的警告消息:
 出现此警告的原因是 Acrobat Reader 尚不信任新的自签名证书。按签名属性按钮,你将看到自签名证书的详细信息。
注:Adobe Reader 信任自签名证书的详细操作说明请参阅随附的附录。
结论
你还可以指定在-pPDF 文件中签署多个页面的选项,例如:
$ python sign_pdf.py -i pdf_file.pdf -s "BM" -x 330 -y 300 -p [1, 3]或签署文件夹中包含的多个 PDF 文件:
$ python sign_pdf.py -i pdf-files-folder -s "BM" -p [1] -x 330 -y 300 -r 0对文档进行数字签名可以节省时间,减少对纸质流程的需求,并让你可以灵活地从几乎任何地方批准文档。
我希望你喜欢这篇文章并帮助你构建工具!
在此处查看完整代码。
相关教程:
- 如何在 Python 中加密和解密 PDF 文件。
- 如何在 Python 中压缩 PDF 文件。
附录
Python如何签署数字签名到PDF文件?在对 PDF 文件(即"Letter of confirmation_signed.pdf")进行签名后,然后在 Adobe Reader 中打开它后,工具栏下方可能会显示以下消息(“至少一个签名有问题”):
实际上,此消息并不表示数字签名无效或损坏,而是表示使用自签名证书添加的数字签名无法由 Adobe Reader 自动验证,因为该证书不在 Adobe 使用的受信任身份列表中来验证签名。
Python如何给PDF文件签名?请按照以下屏幕截图中显示的步骤将自签名证书添加到 Adobe 的受信任身份列表中,下面是一个签名PDF文件多示例:
- 转到编辑>首选项

- 选择签名选项,然后按下面突出显示的更多按钮:

- 选择Trusted Certificates选项并单击Import:

- 单击浏览并从
static文件夹中导入自签名证书:


- 选择新添加的证书并按Edit Trust:

- 启用复选框“将此证书用作受信任的根”,然后按OK:

现在关闭并重新打开 PDF 文档:


好了,这是一个有效的签名!

