Python如何构建异步任务?本文带你了解如何利用 Celery 库、Redis 数据库、SocketIO 库和在 Python 中构建同步和异步任务,包括详细的Python构建同步和异步任务示例。
传统 Web 应用程序本质上是同步的。 用户与浏览器中呈现的 Web 界面进行交互,浏览器根据该用户交互向服务器发出请求,然后服务器以用户的新呈现来响应这些请求。
如今,情况发生了变化,现代网站需要处理来自数十万访问者的请求。当这些请求涉及与数据库或 Web 服务的交互时,响应时间会增加,而当成千上万的访问者访问相同的资源时,网站性能会急剧下降。 这里异步网络来拯救。
以下是我们在选择异步性时可以获得的一些好处:
- 处理更多请求的能力
- 并行执行 I/O 绑定方法。
- 改进的响应能力。
范围
在本教程中,我们将解释如何克服构建 Web 应用程序时遇到的常见陷阱之一,该应用程序处理长时间运行的任务,这些任务限制了 Web 服务器响应新请求的能力。
一个简单的解决方案是在后台异步运行这些长时间运行的任务,在单独的线程或进程中,释放 Web 服务器。
我们将利用 Redis、Flask、Celery 和 SocketIO 等多个组件来卸载长时间运行的任务的执行,并在完成后向客户端发送推送通知,指示其状态。
值得注意的是,本教程不会涵盖asyncio Python 的内置库,它允许我们使用协程并发运行代码。
先决条件
根据我们的要求,以下组件发挥作用:
- Redis:是一种开源、高级的键值存储,是构建高性能、可扩展的 Web 应用程序的合适解决方案。它具有三个主要特点,使其与众不同:
- Redis 将其数据库完全保存在内存中,仅将磁盘用于持久性。
- 与许多键值数据存储相比,Redis 具有相对丰富的数据类型集。
- Redis 可以将数据复制到任意数量的从站。
安装 Redis 超出了本教程的范围。但是,我建议你按照此快速指南将其安装在你的 Windows 机器上。
如果你使用的是 Linux 或 macOS,请运行以下命令之一为你设置 Redis。
Ubuntu/Debian:
$ sudo apt-get install redis-server苹果系统:
$ brew install redis
$ brew services start redis
注意: 出于本教程的目的,我使用的是 Redis 版本 3.0.504
我们将在我们的requirements.txt 文件中安装 Celery 。
注意: 就本教程而言,我使用的是 Celery 4.4.7 版
- Socket.IO:是一个用于实时 Web 应用程序的 JavaScript 库。它支持 Web 客户端和服务器之间的实时、双向通信。它有两部分:运行在浏览器中的客户端库和服务器端库。
- Flask:一个用 Python 编写的 Web 应用程序微框架。
Python构建同步和异步任务示例准备
在本教程中,我将采用脚手架技术,并通过一系列不同的场景引导你了解同步和异步通信之间的差异以及异步通信的变化。
所有场景都将在 Flask 框架内呈现;但是,它们中的大多数可以轻松移植到其他 Python 框架(Django、Pyramid)。
如果本教程引起了你的兴趣,并让你想立即深入研究代码,请转到 此 Github 存储库 以获取本文中使用的代码。
Python如何构建异步任务?创建应用程序骨架
我们的应用程序将包括:
app_sync.py展示同步通信的程序 。- 一个
app_async1.py显示异步服务调用的程序,其中客户端可以使用轮询机制请求服务器端进程的反馈。 - 一个
app_async2.py显示异步服务调用并自动反馈给客户端的程序。 - 一个程序
app_async3.py显示一个发布后的异步服务调用,并自动反馈给客户端。
让我们直接进入设置。当然,你需要 在系统上安装 Python 3。我将使用一个虚拟环境来安装所需的库(你也应该这样做):
$ python -m venv async-venv
$ source async-venv/bin/activate
创建一个名为的文件 requirements.txt 并在其中添加以下几行:
Flask==1.1.2
Flask-SocketIO==5.0.1
Celery==4.4.7
redis==3.5.3
gevent==21.1.2
gevent-websocket==0.10.1
flower==0.9.7
现在安装它们:
$ pip install -r requirements.txt在本教程结束时,我们的文件夹结构将如下所示:
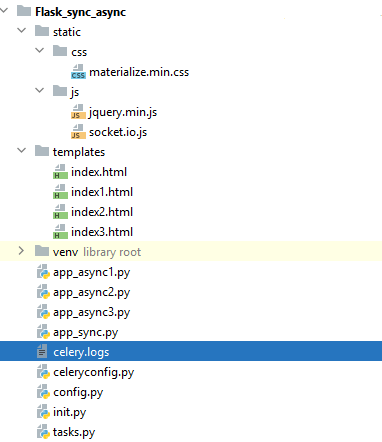
清除掉这些之后,让我们现在开始编写实际的代码。
首先,让我们为我们的应用程序定义配置参数 config.py:
#config.py
#Application configuration File
################################

#Secret key that will be used by Flask for securely signing the session cookie
# and can be used for other security related needs
SECRET_KEY = 'SECRET_KEY'

#Map to REDIS Server Port
BROKER_URL = 'redis://localhost:6379'

#Minimum interval of wait time for our task
MIN_WAIT_TIME = 1
#Maximum interval of wait time for our task
MAX_WAIT_TIME = 20
复制注意:为简洁起见,我将这些配置参数硬编码在 中 config.py,但建议将这些参数存储在单独的文件中(例如 .env)。
其次,为我们的项目创建一个初始化文件 init.py:
#init.py
from flask import Flask

#Create a flask instance
app = Flask(__name__)
#Loads flask configurations from config.py
app.secret_key = app.config['SECRET_KEY']
app.config.from_object("config")

#Setup the Flask SocketIO integration (Required only for asynchronous scenarios)
from flask_socketio import SocketIO
socketio = SocketIO(app,logger=True,engineio_logger=True,message_queue=app.config['BROKER_URL'])
场景 1:展示同步通信
Python构建同步和异步任务示例 - 在我们深入编码之前,我将简要介绍同步通信。
在同步通信中,调用方请求服务,并等待服务完成。只有当它收到该服务的结果时,它才会继续其工作。可以定义超时,以便如果服务未在定义的时间段内完成,则假定调用失败并且调用者继续。
要了解同步通信的工作原理,请想象为你分配了一个专门的服务员。他现在将接受你的订单,将其送到厨房,然后在那里等待厨师为你准备食物。在此期间,服务员什么也不做。
下图说明了一个同步服务调用:
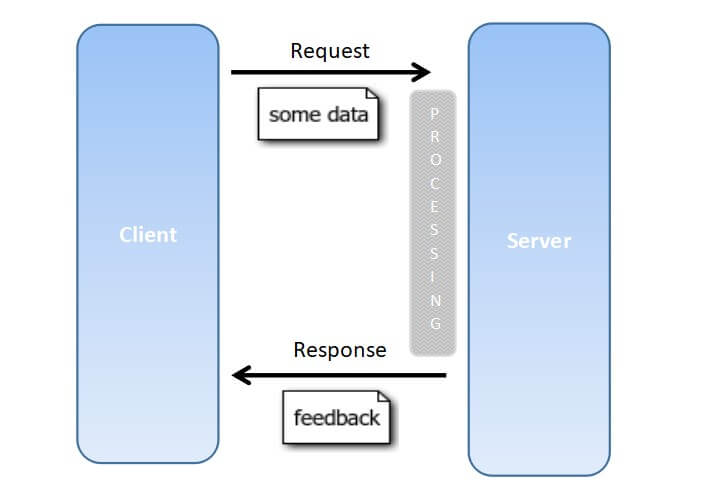
同步通信更适合顺序任务,但是如果有大量并发任务,程序可能会耗尽线程,将新任务等待直到有线程可用。
现在让我们开始编码,我们将创建一个 Flask 可以渲染的模板,index.html其中包含以下 HTML 代码:
templates/index.html
<!DOCTYPE html>
<html>
  <head>
    <title>Synchronicity versus Asynchronicity</title>
    <link rel="stylesheet" href="{{url_for('static',filename='css/materialize.min.css')}}">
    <script src="{{%20url_for('static',filename='js/jquery.min.js')%20}}"></script>
    <script src="{{%20url_for('static',filename='js/socket.io.js')%20}}"></script>
    <meta name="viewport" content="width=device-width, initial-scale=1.0"/>
  </head>
  <body class="container">
    <div class="row">
        <h5>Click to start a post scheduled ansycnhronous task with automatic feedback.</h5>
    </div>
    <div class="card-panel">
      <form method='post' id="runTaskForm" action="/runPSATask">
          <div>
             <input id="duration" name="duration" placeholder="Enter duration in seconds. for example: 30" type="text">
             <label for="duration">Duration</label>
          </div>
          <button style="height:50px;width:600px" type="submit" id="runTask">Run A Post Scheduled Asynchronous Task With Automatic Feedback</button>
      </form>
    </div>
    <div class="row">
        <div id="Messages" class="red-text" style="width:800px; height:400px; overflow-y:scroll;"></div>
    </div>
    <script>
      $(document).ready(function(){
        var namespace='/runPSATask';
        var url = 'http://' + document.domain + ':' + location.port + namespace;
        var socket = io.connect(url);
        socket.on('connect', function() {
                             socket.emit('join_room');
                            });

        socket.on('msg' , function(data) {
                            $("#Messages").prepend('<li>'+data.msg+'</li>');
                          });

        socket.on('status', function(data) {
                            ////alert('socket on status ='+ data.msg);
                            if (data.msg == 'End') {
                                $("#runTask").attr("disabled",false);
                            };
                          });
      });
    </script>
    <script>
      $("#runTask").click(function(e) {
         $("#runTask").attr("disabled",true);
         $("#Messages").empty();
         $.ajax({ type: "Post"
                , url: '/runPSATask'
                , data: $("#runTaskForm").serialize()
                , success: function(data) {
                    $("#Messages").empty();
                    $("#Messages").prepend('<li>The Task ' + data.taskid + ' has been submitted and will execute in ' + data.duration + ' seconds. </li>');
                  }
                });
         e.preventDefault();
         console.log('runPSATask complete');
      });
    </script>
  </body>
</html>
该模板包括:
runTask将使用 route 向服务器提交任务的按钮/runSyncTask。- 结果将放置在
divid 中Messages。
接下来,我们将创建一个名为的程序app_sync.py,该程序将包含我们的 Flask 应用程序,我们将在该程序中定义两个路由:
"/"呈现网页 (index.html)"/runSyncTask"模拟长时间运行的任务,该任务将生成一个 1 到 20 秒之间的随机数,然后在每次迭代中运行一个睡眠 1 秒的循环。
#app_sync.py
from flask import render_template, jsonify
from random import randint
from init import app
import tasks

#Render the predefined template index.html
@app.route("/",methods=['GET'])
def index():
    return render_template('index.html')

#Defining the route for running A Synchronous Task
@app.route("/runSyncTask",methods=['POST'])
def long_sync_task():
    print("Running","/runSyncTask")
    #Generate a random number between MIN_WAIT_TIME and MAX_WAIT_TIME
    n = randint(app.config['MIN_WAIT_TIME'],app.config['MAX_WAIT_TIME'])
    #Call the function long_sync_task included within tasks.py
    task = tasks.long_sync_task(n=n)
    #Return the random wait time generated
    return jsonify({ 'waittime': n })

if __name__ == "__main__":
app.run(debug=True)本教程中定义的所有任务的核心逻辑位于程序中tasks.py:
#tasks.py
import time
from celery import Celery
from celery.utils.log import get_task_logger
from flask_socketio import SocketIO
import config

# Setup the logger (compatible with celery version 4)
logger = get_task_logger(__name__)

# Setup the celery client
celery = Celery(__name__)
# Load celery configurations from celeryconfig.py
celery.config_from_object("celeryconfig")

# Setup and connect the socket instance to Redis Server
socketio = SocketIO(message_queue=config.BROKER_URL)

###############################################################################
def long_sync_task(n):
    print(f"This task will take {n} seconds.")
    for i in range(n):
        print(f"i = {i}")
        time.sleep(1)
###############################################################################
@celery.task(name = 'tasks.long_async_task')
def long_async_task(n,session):
    print(f"The task of session {session}  will take {n} seconds.")
    for i in range(n):
        print(f"i = {i}")
        time.sleep(1)
###############################################################################
def send_message(event, namespace, room, message):
    print("Message = ", message)
    socketio.emit(event, {'msg': message}, namespace=namespace, room=room)

@celery.task(name = 'tasks.long_async_taskf')
def long_async_taskf(data):
    room      = data['sessionid']
    namespace = data['namespase']
    n         = data['waittime']

    #Send messages signaling the lifecycle of the task
    send_message('status', namespace, room, 'Begin')
    send_message('msg', namespace, room, 'Begin Task {}'.format(long_async_taskf.request.id))
    send_message('msg', namespace, room, 'This task will take {} seconds'.format(n))

    print(f"This task will take {n} seconds.")
    for i in range(n):
        msg = f"{i}"
        send_message('msg', namespace, room, msg )
        time.sleep(1)

    send_message('msg', namespace, room, 'End Task {}'.format(long_async_taskf.request.id))
    send_message('status', namespace, room, 'End')
###############################################################################
@celery.task(name = 'tasks.long_async_sch_task')
def long_async_sch_task(data):
    room      = data['sessionid']
    namespace = data['namespase']
    n         = data['waittime']

    send_message('status', namespace, room, 'Begin')
    send_message('msg'   , namespace, room, 'Begin Task {}'.format(long_async_sch_task.request.id))
    send_message('msg'   , namespace, room, 'This task will take {} seconds'.format(n))

    print(f"This task will take {n} seconds.")
    for i in range(n):
        msg = f"{i}"
        send_message('msg', namespace, room, msg )
        time.sleep(1)

    send_message('msg'   , namespace, room, 'End Task {}'.format(long_async_sch_task.request.id))
    send_message('status', namespace, room, 'End')
###############################################################################
在本节中,我们只会将该long_sync_task()函数用作同步任务。
让我们通过运行app_sync.py程序来测试我们的同步场景:
$ python app_sync.py访问http://localhost:5000运行 Flask 实例的链接,你将看到以下输出:

按下按钮“运行同步任务”并等待该过程完成:

完成后,将显示一条消息,表明为触发任务分配的随机时间。
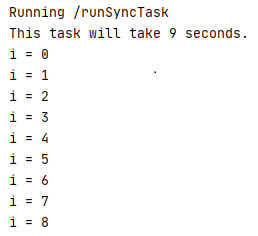
同时,当服务器执行任务时,你将在控制台中看到每秒显示一个递增的数字:
场景 2:显示具有轮询机制的异步服务调用
Python如何构建异步任务?在本节中,我们将展示一个异步服务调用,其中客户端可以使用轮询机制请求服务器端进程的反馈。简而言之,异步意味着程序不等待特定进程完成,而是继续进行。
主叫方发起业务呼叫,但做ESñ加时赛等待结果。调用者立即继续其工作而不关心结果。如果调用者对结果感兴趣,那么我们稍后会讨论一些机制。
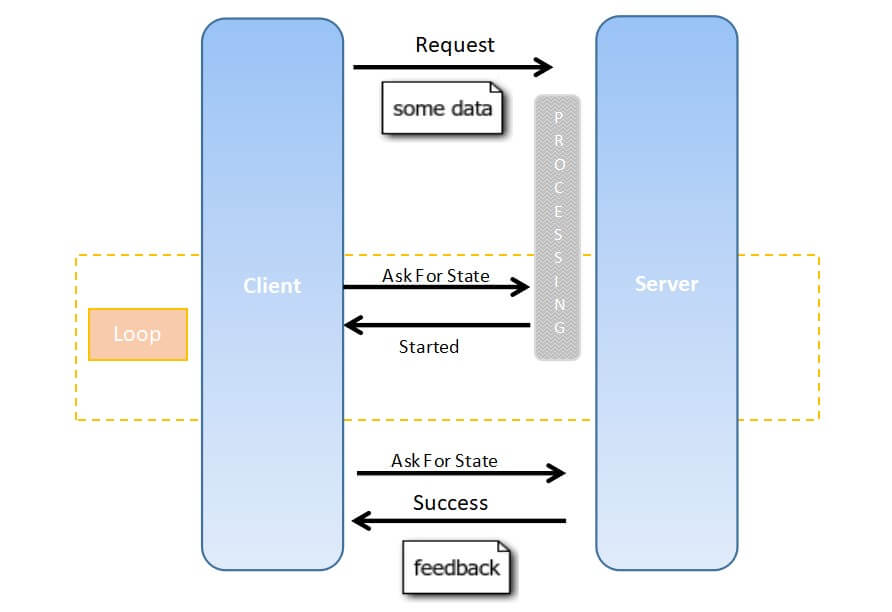
最简单的异步消息交换模式称为 即发即弃,意味着发送了一条消息但不需要反馈,但如果需要反馈,客户端可能会通过轮询机制反复询问结果 。
轮询会导致潜在的高网络负载,因此不建议使用。尽管如此,它的优点是服务提供者(服务器)不需要知道它的客户端。
下图说明了我们的场景:
 Python构建同步和异步任务示例 - 异步通信更适合必须响应事件的代码——例如,任何涉及等待的耗时的 I/O 绑定操作。
选择异步性使系统能够同时处理更多请求,从而提高吞吐量。
现在让我们进入编码。我们将使用配置文件定义 celery 初始化参数celeryconfig.py:
#celeryconfig.py
#Celery Configuration parameters
#Map to Redis server
broker_url = 'redis://localhost:6379/0'

#Backend used to store the tasks results
result_backend = 'redis://localhost:6379/0'

#A string identifying the default serialization to use Default json
task_serializer = 'json'
result_serializer = 'json'
accept_content = ['json']

#When set to false the local system timezone is used.
enable_utc = False

#To track the started state of a task, we should explicitly enable it
task_track_started = True

#Configure Celery to use a specific time zone.
#The timezone value can be any time zone supported by the pytz library
#timezone = 'Asia/Beirut'
#enable_utc = True
我们将创建一个 Flask 可以渲染的模板 ( index1.html):
<!DOCTYPE html>
<html>
  <head>
    <title>Synchronicity versus Asynchronicity</title>
    <link rel="stylesheet" href="{{url_for('static',filename='css/materialize.min.css')}}">
    <script src="{{%20url_for('static',filename='js/jquery.min.js')%20}}"></script>
    <meta name="viewport" content="width=device-width, initial-scale=1.0"/>
  </head>
  <body class="container">
    <div class="row">
        <h4>Click to start an ansycnhronous task</h4>
    </div>
    <div class="card-panel">
      <form method='post' id="runTaskForm" action="/runAsyncTask">
          <button style="height:50px;width:400px" type="submit" id="runTask">Run An Asynchronous Task</button>
      </form>
      <form method='post' id="getTaskResultForm" action="/getAsyncTaskResult">
          <button style="height:50px;width:400px" type="submit" id="getTaskResult">Get Asynchronous Task Result</button>
      </form>
    </div>
    <div class="row">
        <div id="Messages" class="red-text" style="width:800px; height:400px; overflow-y:scroll;"></div>
    </div>
    <script>
      $("#runTask").click(function(e) {
         $("#runTask").attr("disabled",true);
         $("*").css("cursor","wait");
         $("#Messages").empty();
         $.ajax({ type: "Post"
                , url: '/runAsyncTask'
                , data: $("#runTaskForm").serialize()
                , success: function(data) {
                    $("#runTask").attr("disabled",false);
                    $("*").css("cursor","");
                    $("#Messages").append('The task ' + data.taskid + ' will be executed in asynchronous manner for ' + data.waittime + ' seconds...');
                  }
                });
         e.preventDefault();
         console.log('runAsyncTask complete');
      });
      $("#getTaskResult").click(function(e) {
         var msg = $("#Messages").text();
         var taskid = msg.match("task(.*)will");
         //Get The Task ID from The Messages div and create a Target URL
         var vurl = '/getAsyncTaskResult?taskid=' + jQuery.trim(taskid[1]);
         $.ajax({ type: "Post"
                , url: vurl
                , data: $("#getTaskResultForm").serialize()
                , success: function(data) {
                    $("*").css("cursor","");
                    $("#Messages").append('<p> The Status of the task = ' + data.taskid + ' is ' + data.taskstatus + '</p>');
                  }
                });
         e.preventDefault();
         console.log('getAsyncTaskResult complete');
      });
    </script>
  </body>
</html>然后,我们创建app_async1.py包含 Flask 应用程序的程序:
#app_async1.py
from flask import render_template, jsonify, session,request
from random import randint
import uuid
import tasks
from init import app
from celery.result import AsyncResult

@app.route("/",methods=['GET'])
def index():
    # create a unique ID to assign for the asynchronous task
    if 'uid' not in session:
        sid = str(uuid.uuid4())
        session['uid'] = sid
        print("Session ID stored =", sid)
    return render_template('index1.html')

#Run an Asynchronous Task
@app.route("/runAsyncTask",methods=['POST'])
def long_async_task():
    print("Running", "/runAsyncTask")
    #Generate a random number between MIN_WAIT_TIME and MAX_WAIT_TIME
    n = randint(app.config['MIN_WAIT_TIME'],app.config['MAX_WAIT_TIME'])
    sid = str(session['uid'])
    task = tasks.long_async_task.delay(n=n,session=sid)
    #print('taskid',task.id,'sessionid',sid,'waittime',n )
    return jsonify({'taskid':task.id,'sessionid':sid,'waittime':n })

#Get The Result of The Asynchronous Task
@app.route('/getAsyncTaskResult', methods=['GET', 'POST'])
def result():
    task_id = request.args.get('taskid')
    # grab the AsyncResult
    result = AsyncResult(task_id)
    # print the task id
    print("Task ID = ", result.task_id)
    # print the Asynchronous result status
    print("Task Status = ", result.status)
    return jsonify({'taskid': result.task_id, 'taskstatus': result.status})

if __name__ == "__main__":
   app.run(debug=True)
该计划中有三个主要路线:
"/": 呈现网页 (index1.html)。"/runAsyncTask": 调用一个异步任务,它将生成一个 1 到 20 秒之间的随机数,然后运行一个循环,在每次迭代中休眠 1 秒。"/getAsyncTaskResult":根据接收到的任务ID,收集任务状态。
注意:此场景不涉及 SocketIO 组件。
让我们测试这个场景,按照以下步骤进行:
- 启动 Redis 服务器:在 Windows 上,找到安装 Redis 的文件夹并双击
redis-server.exe。对于默认安装或在 Linux/MacOS 上,请确保 Redis 实例在TCP 端口 6379上运行。 - 启动 Celery worker:在 Windows 上,打开命令提示符,转到项目文件夹并运行以下命令:
$ async-venv\Scripts\celery.exe worker -A tasks --loglevel=DEBUG --concurrency=1 -P solo -f celery.logs复制在 Linux/MacOS 上,非常相似:$ async-venv/bin/celery worker -A tasks --loglevel=DEBUG --concurrency=1 -P solo -f celery.logs复制请注意,这async-venv是你的虚拟环境名称,如果你以不同方式命名,请确保将其替换为你的名称。celery 启动后,应显示以下输出: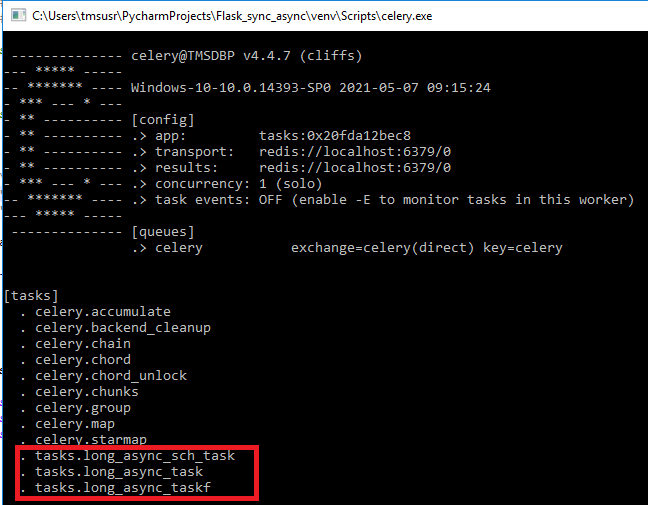 确保程序
确保程序tasks.py中定义的任务反映在 Celery 中。 - 打开终端窗口,启动主程序:
$ python app_async1.py复制
然后打开浏览器并访问以下链接:
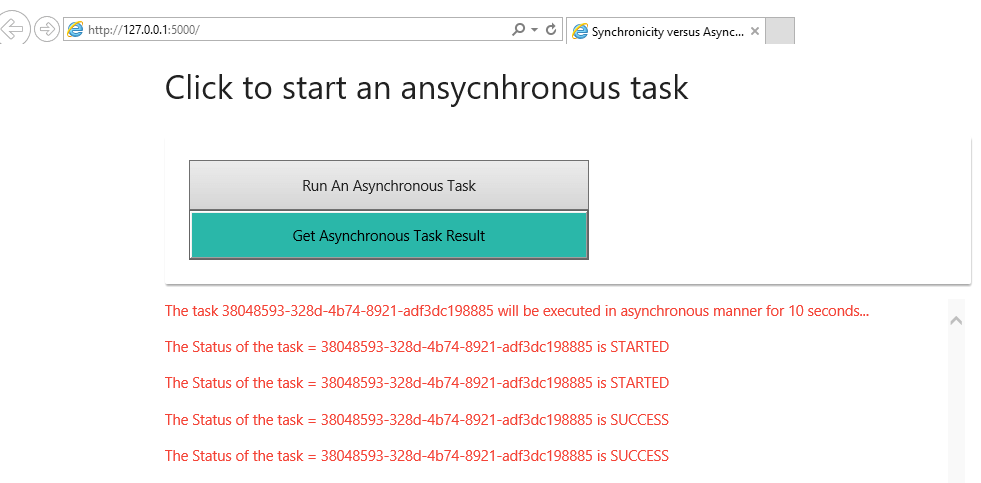
通过按下按钮运行异步任务,一个新任务将被排队然后直接执行;“消息”部分将显示一条消息,显示任务的 ID 及其执行时间。
通过按下按钮获取异步任务结果(连续),你将在特定时间收集任务的状态。
PENDING: 等待执行。STARTED: 任务已经开始。SUCCESS: 任务执行成功。FAILURE: 任务执行导致异常。RETRY: 正在重试任务。REVOKED: 任务已撤销。
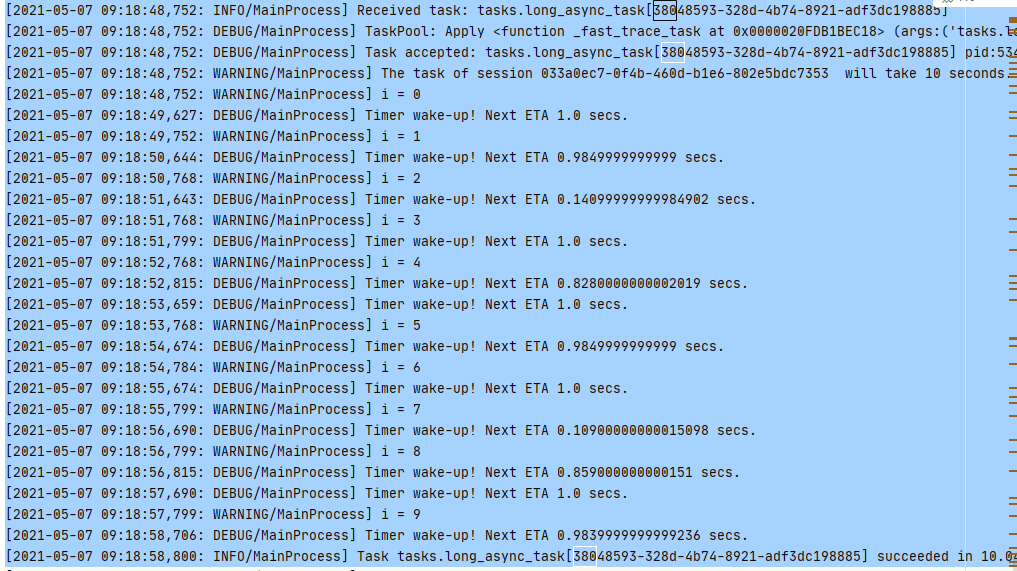
在查看日志文件中包含的 celery worker 日志时celery.logs,你会注意到任务生命周期:
 场景 3:显示具有自动反馈的异步服务调用
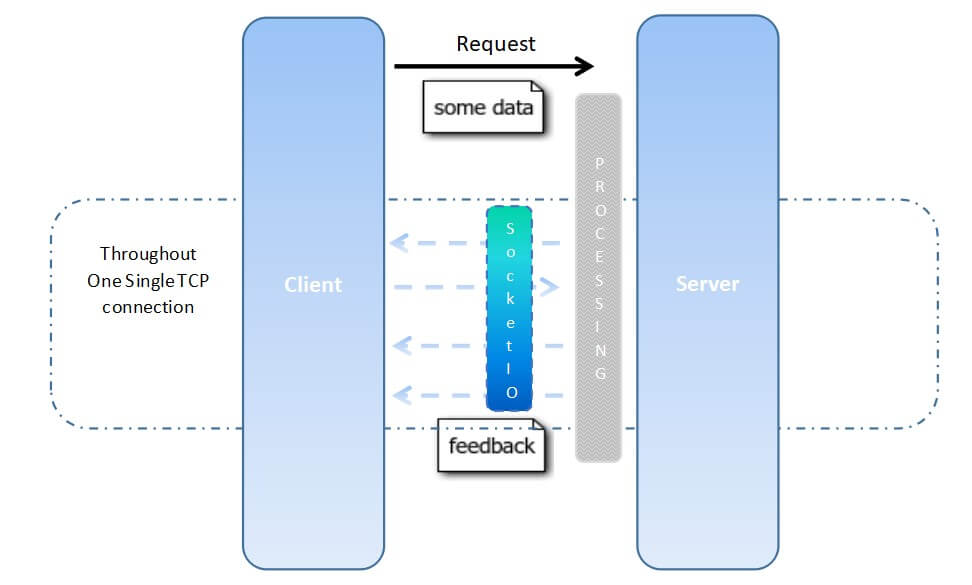
基于我们之前的场景,为了减轻发起多个请求来收集任务状态所带来的麻烦,我们将尝试结合套接字技术,使服务器能够不断更新客户端有关任务状态的信息。
实际上,套接字 IO 引擎允许基于事件的实时双向通信。
这给我们带来的主要优势是它减少了网络上的负载量,并且可以更有效地将信息传播到大量客户端。
下图说明了我们的场景:
Python构建同步和异步任务示例 - 在进一步挖掘之前,我将尝试简要解释要完成的步骤:
为了能够将来自 celery 的消息发送回 Web 浏览器,我们将利用以下内容:
- Flask-SocketIO的消息队列功能,这将允许 Celery worker 与客户端通信。
- Ť他能力Socket.io的这是一个易于使用的JavaScript库,使WebSocket连接。
为了有效管理我们的数据连接,我们将采用以下分区策略:
- 我们将为
"/runAsyncTaskF"这个场景分配命名空间。(命名空间用于通过单个共享连接分隔服务器逻辑)。 - 我们将为每个用户会话分配一个房间。(房间是命名空间的细分或子通道)。
现在让我们开始编码:
- 我们将创建一个 Flask 可以渲染的模板 (
index2.html):
<!DOCTYPE html>
<html>
<head>
    <title>Synchronicity versus Asynchronicity</title>
    <link rel="stylesheet" href="{{url_for('static',filename='css/materialize.min.css')}}">
    <script src="{{%20url_for('static',filename='js/jquery.min.js')%20}}"></script>
    <script src="{{%20url_for('static',filename='js/socket.io.js')%20}}"></script>
    <meta name="viewport" content="width=device-width, initial-scale=1.0" />
</head>
<body class="container">
    <div class="row">
        <h5>Click to start an ansycnhronous task with automatic feedback.</h5>
    </div>
    <div class="card-panel">
        <form method='post' id="runTaskForm" action="/runAsyncTask">
            <button style="height:50px;width:400px" type="submit" id="runTask">Run An Asynchronous Task With Automatic Feedback</button>
        </form>
    </div>
    <div class="row">
        <div id="Messages" class="red-text" style="width:800px; height:400px; overflow-y:scroll;"></div>
    </div>
    <script>
        $(document).ready(function() {
            var namespace = '/runAsyncTaskF';
            var url = 'http://' + document.domain + ':' + location.port + namespace;
            var socket = io.connect(url);
            socket.on('connect', function() {
                ////alert('socket on connect');
                socket.emit('join_room');
            });
            socket.on('msg', function(data) {
                ////alert('socket on msg ='+ data.msg);
                $("#Messages").prepend('<li>' + data.msg + '</li>');
            });
            socket.on('status', function(data) {
                ////alert('socket on status ='+ data.msg);
                if (data.msg == 'End') {
                    $("#runTask").attr("disabled", false);
                };
            });
        });
    </script>
    <script>
        $("#runTask").click(function(e) {
            $("#runTask").attr("disabled", true);
            $("*").css("cursor", "wait");
            $("#Messages").empty();

            $.ajax({
                type: "Post",
                url: '/runAsyncTaskF',
                data: $("#runTaskForm").serialize(),
                success: function(data) {
                    $("*").css("cursor", "");
                    $("#Messages").empty();
                    $("#Messages").prepend('<li>The Task ' + data.taskid + ' has been submitted. </li>');
                }
            });
            e.preventDefault();
            console.log('runAsyncTaskF complete');
        });
    </script>
</body>
</html>- 我们将创建一个名为的程序
app_async2.py,该程序将包含我们的 Flask 应用程序:
#Gevent is a coroutine based concurrency library for Python
from gevent import monkey
#For dynamic modifications of a class or module
monkey.patch_all()
from flask import render_template, jsonify, session, request
from random import randint
import uuid
import tasks
from init import app, socketio
from flask_socketio import join_room

@app.route("/",methods=['GET'])
def index():
    # create a unique session ID and store it within the Flask session
    if 'uid' not in session:
        sid = str(uuid.uuid4())
        session['uid'] = sid
        print("Session ID stored =", sid)
    return render_template('index2.html')

#Run an Asynchronous Task With Automatic Feedback
@app.route("/runAsyncTaskF",methods=['POST'])
def long_async_taskf():
    print("Running", "/runAsyncTaskF")
    # Generate a random number between MIN_WAIT_TIME and MAX_WAIT_TIME
    n = randint(app.config['MIN_WAIT_TIME'], app.config['MAX_WAIT_TIME'])

    data = {}
    data['sessionid'] = str(session['uid'])
    data['waittime']  = n
    data['namespase'] = '/runAsyncTaskF'

    task = tasks.long_async_taskf.delay(data)
    return jsonify({ 'taskid':task.id
                    ,'sessionid':data['sessionid']
                    ,'waittime':data['waittime']
                    ,'namespace':data['namespase']
                    })

@socketio.on('connect', namespace='/runAsyncTaskF')
def socket_connect():
    #Display message upon connecting to the namespace
    print('Client Connected To NameSpace /runAsyncTaskF - ',request.sid)

@socketio.on('disconnect', namespace='/runAsyncTaskF')
def socket_connect():
    # Display message upon disconnecting from the namespace
    print('Client disconnected From NameSpace /runAsyncTaskF - ',request.sid)

@socketio.on('join_room', namespace='/runAsyncTaskF')
def on_room():
    room = str(session['uid'])
    # Display message upon joining a room specific to the session previously stored.
    print(f"Socket joining room {room}")
    join_room(room)

@socketio.on_error_default
def error_handler(e):
    # Display message on error.
    print(f"socket error: {e}, {str(request.event)}")

if __name__ == "__main__":
    # Run the application with socketio integration.
    socketio.run(app,debug=True)
该计划中有两条主要路线:
"/": 呈现网页 (index2.html)。"/runAsyncTaskF":调用一个异步任务,它将执行以下操作:- 生成 1 到 20 秒之间的随机数。
long_async_taskf()在程序中调用相应的任务tasks.py。
要运行此场景:
- 启动Redis服务器。
- 启动芹菜工人。
- 跑
app_async2.py
打开浏览器并访问以下链接并按下按钮,你将逐渐收到类似于以下内容的输出:
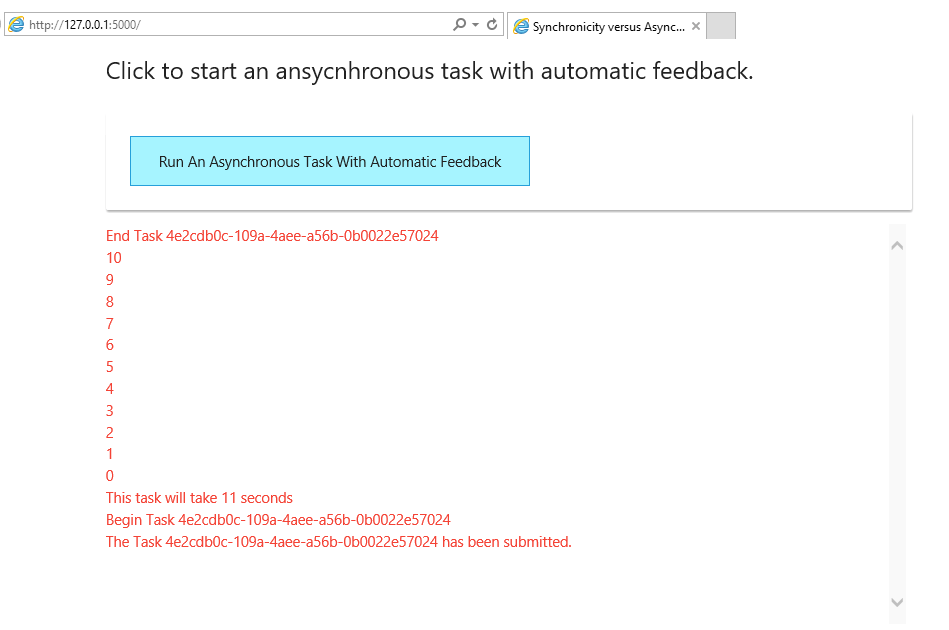 同时,你将在控制台上获得以下输出:
 你还可以始终检查
celery.logs任务生命周期的文件。
场景 4:显示具有自动反馈的端口调度异步服务调用
Python如何构建异步任务?这个场景类似于场景3;唯一的区别是,该任务不是直接运行异步任务,而是在客户端指定的某个持续时间后调度运行。
让我们继续进行编码,我们将创建index3.html带有一个新字段的模板,该字段"Duration"表示在执行异步任务之前等待的时间(以秒为单位):
<!DOCTYPE html>
<html>
<head>
    <title>Synchronicity versus Asynchronicity</title>
    <link rel="stylesheet" href="{{url_for('static',filename='css/materialize.min.css')}}">
    <script src="{{%20url_for('static',filename='js/jquery.min.js')%20}}"></script>
    <script src="{{%20url_for('static',filename='js/socket.io.js')%20}}"></script>
    <meta name="viewport" content="width=device-width, initial-scale=1.0" />
</head>
<body class="container">
    <div class="row">
        <h5>Click to start a post scheduled ansycnhronous task with automatic feedback.</h5>
    </div>
    <div class="card-panel">
        <form method='post' id="runTaskForm" action="/runPSATask">
            <div>
                <input id="duration" name="duration" placeholder="Enter duration in seconds. for example: 30" type="text">
                <label for="duration">Duration</label>
            </div>
            <button style="height:50px;width:600px" type="submit" id="runTask">Run A Post Scheduled Asynchronous Task With Automatic Feedback</button>
        </form>
    </div>
    <div class="row">
        <div id="Messages" class="red-text" style="width:800px; height:400px; overflow-y:scroll;"></div>
    </div>
    <script>
        $(document).ready(function() {
            var namespace = '/runPSATask';
            var url = 'http://' + document.domain + ':' + location.port + namespace;
            var socket = io.connect(url);
            socket.on('connect', function() {
                socket.emit('join_room');
            });
            socket.on('msg', function(data) {
                $("#Messages").prepend('<li>' + data.msg + '</li>');
            });
            socket.on('status', function(data) {
                ////alert('socket on status ='+ data.msg);
                if (data.msg == 'End') {
                    $("#runTask").attr("disabled", false);
                };
            });
        });
    </script>
    <script>
        $("#runTask").click(function(e) {
            $("#runTask").attr("disabled", true);
            $("#Messages").empty();
            $.ajax({
                type: "Post",
                url: '/runPSATask',
                data: $("#runTaskForm").serialize(),
                success: function(data) {
                    $("#Messages").empty();
                    $("#Messages").prepend('<li>The Task ' + data.taskid + ' has been submitted and will execute in ' + data.duration + ' seconds. </li>');
                }
            });
            e.preventDefault();
            console.log('runPSATask complete');
        });
    </script>
</body>
</html>接下来是app_async3.py这个场景的Flask 应用程序:
#app_async3.py
from gevent import monkey
monkey.patch_all()

from flask import render_template, jsonify, session, request
from random import randint
import uuid
import tasks
from init import app, socketio
from flask_socketio import join_room

@app.route("/",methods=['GET'])
def index():
    # create a unique session ID
    if 'uid' not in session:
        sid = str(uuid.uuid4())
        session['uid'] = sid
        print("Session ID stored =", sid)
    return render_template('index3.html')

#Run a Post Scheduled Asynchronous Task With Automatic Feedback
@app.route("/runPSATask",methods=['POST'])
def long_async_sch_task():
        print("Running", "/runPSATask")
        # Generate a random number between MIN_WAIT_TIME and MAX_WAIT_TIME
        n = randint(app.config['MIN_WAIT_TIME'], app.config['MAX_WAIT_TIME'])
        data = {}
        data['sessionid'] = str(session['uid'])
        data['waittime']  = n
        data['namespase'] = '/runPSATask'
        data['duration']  = int(request.form['duration'])
        #Countdown represents the duration to wait in seconds before running the task
        task = tasks.long_async_sch_task.apply_async(args=[data],countdown=data['duration'])
        return jsonify({ 'taskid':task.id
                        ,'sessionid':data['sessionid']
                        ,'waittime': data['waittime']
                        ,'namespace':data['namespase']
                        ,'duration':data['duration']
                        })


@socketio.on('connect', namespace='/runPSATask')
def socket_connect():
    print('Client Connected To NameSpace /runPSATask - ',request.sid)

@socketio.on('disconnect', namespace='/runPSATask')
def socket_connect():
    print('Client disconnected From NameSpace /runPSATask - ',request.sid)

@socketio.on('join_room', namespace='/runPSATask')
def on_room():
    room = str(session['uid'])
    print(f"Socket joining room {room}")
    join_room(room)

@socketio.on_error_default
def error_handler(e):
    print(f"socket error: {e}, {str(request.event)}")

if __name__ == "__main__":
socketio.run(app,debug=True)请注意,我们long_async_sch_task()从tasks.py这次开始使用任务方法。
app_async3.py像以前一样运行,然后打开浏览器:
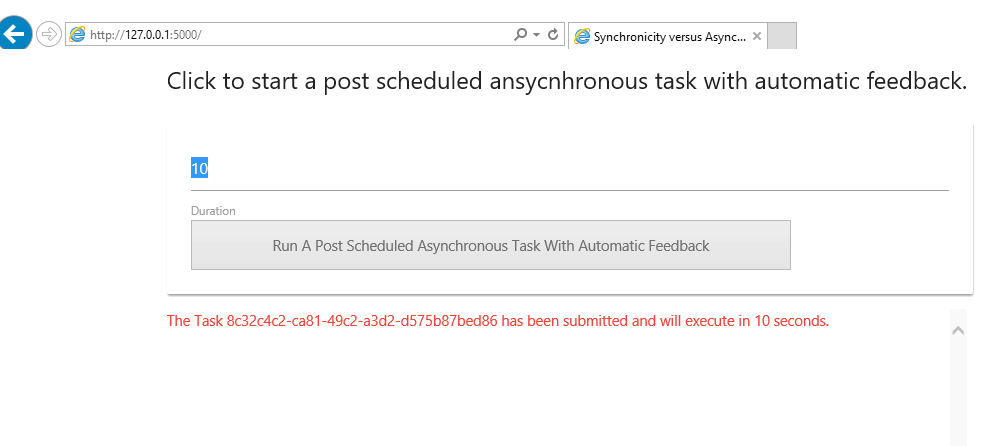 输入持续时间(即 10)并按下按钮以创建发布计划异步任务。创建后,消息框中将显示一条显示任务详细信息的消息。
你应该等待你在持续时间字段中指定的时间,你将看到正在执行的任务:
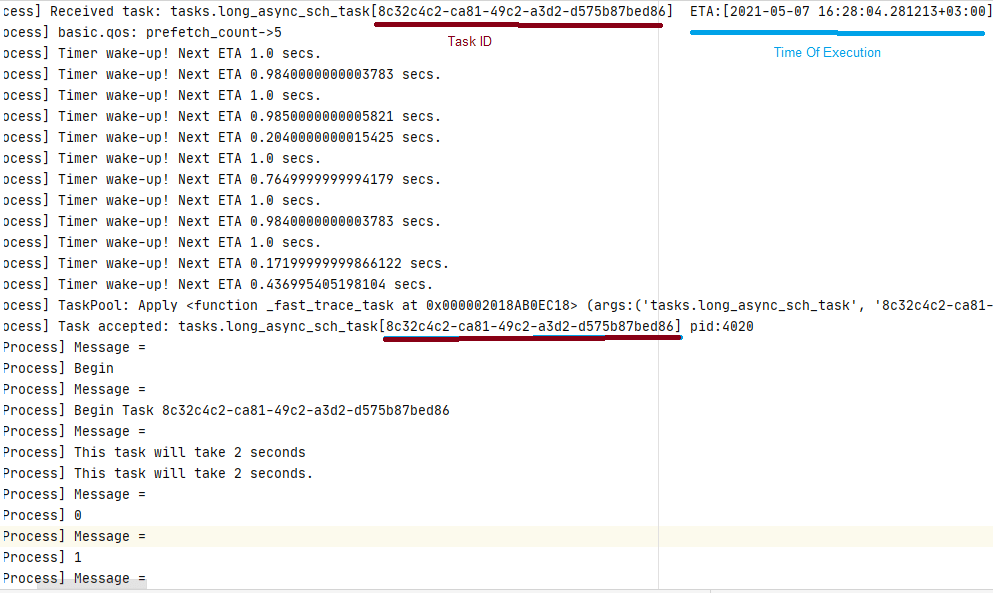
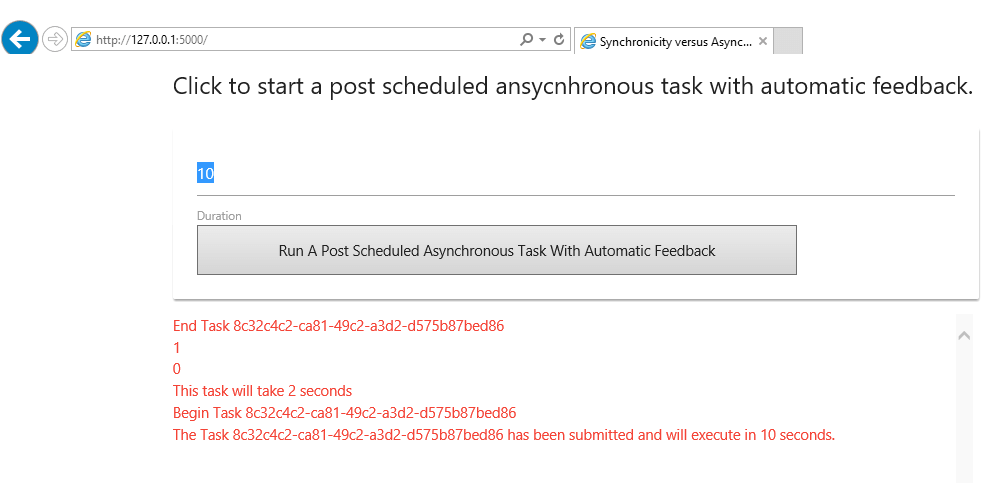 此外,在查看
celery.logs日志文件中包含的 celery worker日志时,你会注意到任务生命周期:
 附录:使用 Flower 监控 Celery
Python构建同步和异步任务示例:为了更好地监控 celery 任务,你可以安装Flower,这是一个用于监控和管理 Celery 集群的基于 Web 的工具。
注意:花库是requirements.txt.
要使用花查看你的 Celery 任务,请按以下步骤操作:
- 像以前一样启动Redis服务器。
- 像以前一样启动 Celery 工人。
- 在 Windows 上使用命令启动花:
$ async-venv\Scripts\flower.exe worker -A tasks --port=5555复制在 Linux/MacOS 上:$ async-venv/bin/flower worker -A tasks --port=5555复制
你将在控制台中获得以下信息:
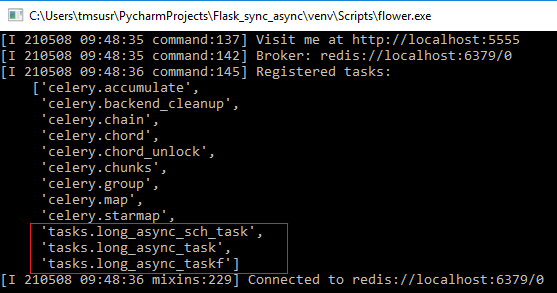 返回你的应用程序并运行任务,然后打开浏览器
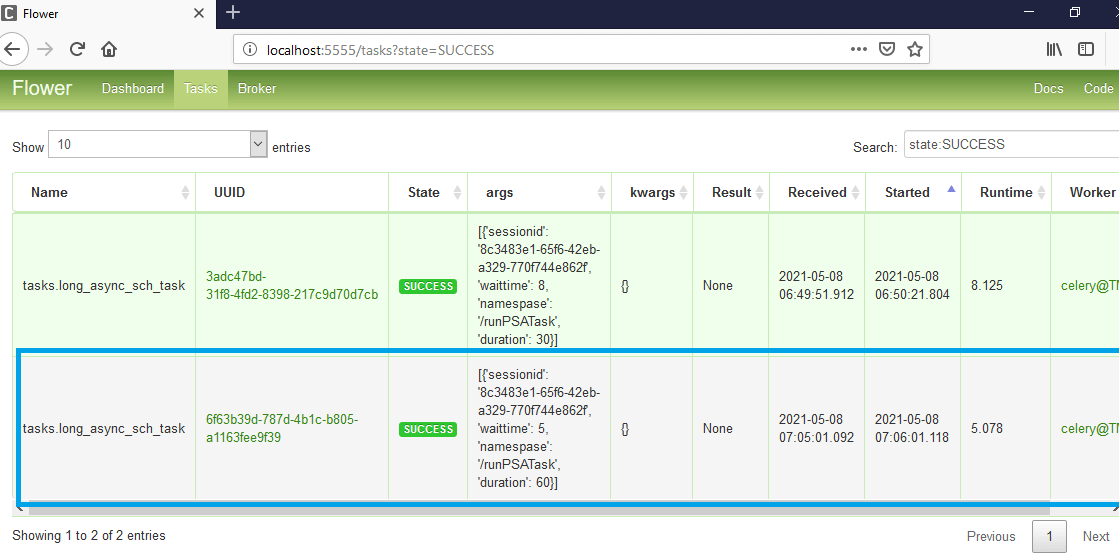
http://localhost:5555并前往任务选项卡:

当你的任务完成后,你会注意到在花仪表板中如下所示:
 结论
结论
Python如何构建异步任务?我希望本文能帮助你在 Celery 的帮助下获得同步和异步请求的概念基础。虽然同步请求可能很慢,而异步请求速度很快,但关键在于识别适合任何场景的方法。有时,他们甚至一起工作。

