Python如何制作电报机器人?了解如何使用 Telegram API 和 python-telegram-bot 包装器在 Python 中构建 Telegram Bot,包括Python制作电报机器人实例。
自动化每天都变得越来越流行,因此,现在流行的服务和应用程序通常提供一个用于编程使用的接口,这个接口就是我们所说的 API 或应用程序编程接口,提供 API 的应用程序示例包括Google Drive,谷歌搜索和Github。
API是一组端点,任何程序员都可以用来与服务通信,而不必尝试模仿用户使用应用程序,这通常是不可能的,因为验证码的使用越来越广泛。
如何用Python制作电报机器人?当流行的应用程序提供 API 时,程序员通常会为想要与应用程序通信的程序员编写易于使用的库(充当 API 的抽象层,通常称为包装器),而不是阅读有关API 端点,只需下载他们选择的编程语言的库并阅读其文档就更简单了,这通常更惯用,并且更快地习惯。
在本教程中,我们将看到如何用 Python 编写 Telegram Bot,bot 是受代码控制的用户,例如编写一个 bot 可以有很多应用程序;自动响应客户请求。Telegram 提供了两个 API,一个用于创建机器人,一个用于创建客户端,我们将使用第一个,可以在此处找到 Bot API 的文档。
我们将使用流行的python-telegram-bot包装器来简化我们的工作:
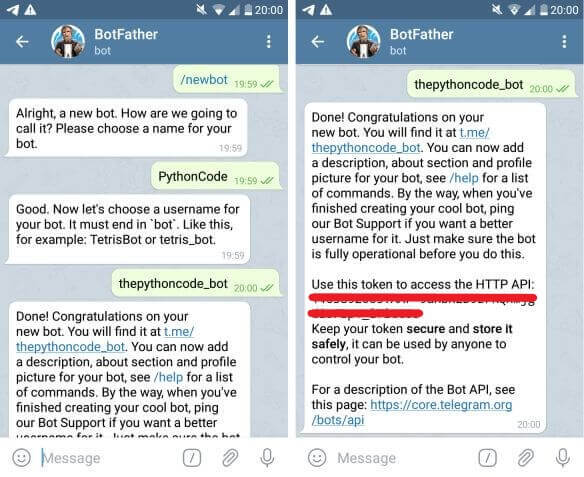
pip3 install python-telegram-bot现在,我们需要获取一个 API Key 来与 Telegram API 通信,要获取一个,我们需要手动联系Telegram上的@BotFather,如下所示:
 当我们开始讨论时,我们会得到一个命令列表,我们用
/newbot命令创建机器人,一旦它被创建,我们就会获得一个与机器人通信的令牌(在我们的例子中,它隐藏在红色中)。
Python如何制作电报机器人?现在我们可以开始用 Python 编写我们的机器人了:
import telegram
import telegram.ext
import re
from random import randint
import logging
logging.basicConfig(level=logging.INFO,
                    format='%(asctime)s - %(name)s - %(levelname)s - %(message)s')

# The API Key we received for our bot
API_KEY = "<INSERT_API_KEY_HERE>"
# Create an updater object with our API Key
updater = telegram.ext.Updater(API_KEY)
# Retrieve the dispatcher, which will be used to add handlers
dispatcher = updater.dispatcher在以上Python制作电报机器人实例中,请注意,我们在脚本的开头添加了日志记录,并将日志记录级别设置为DEBUG,这将帮助我们了解机器人的情况,它是否正在运行,我们从用户那里获得的消息等。如果你不熟悉登录 Python,查看本教程。
调度程序是将请求分派给它们的处理程序的对象,我们需要向它添加一个对话处理程序,以描述我们的机器人回复消息的方式。
该电报API允许定义机器人作为有限状态机,我们可以处理不同的事件,并根据用户的输入,或动作的类型变化状态。
如何用Python制作电报机器人?在本教程中,我们将构建以下 FSM:
 Python如何制作电报机器人?从Start 开始执行,Welcome会询问用户是否要回答问题,如果回答是yes或y,则发送问题,如果回答正确,则将状态切换为Correct。否则,它将在Question 上循环,每次生成不同的问题。
一旦响应正确,它会询问用户他是否觉得教程有帮助,然后转到结束状态,这是最后一个状态。定义我们的状态:
# Our states, as integers
WELCOME = 0
QUESTION = 1
CANCEL = 2
CORRECT = 3
现在让我们定义我们的处理程序:
# The entry function
def start(update_obj, context):
    # send the question, and show the keyboard markup (suggested answers)
    update_obj.message.reply_text("Hello there, do you want to answer a question? (Yes/No)",
        reply_markup=telegram.ReplyKeyboardMarkup([['Yes', 'No']], one_time_keyboard=True)
    )
    # go to the WELCOME state
    return WELCOME

# helper function, generates new numbers and sends the question
def randomize_numbers(update_obj, context):
    # store the numbers in the context
    context.user_data['rand_x'], context.user_data['rand_y'] = randint(0,1000), randint(0, 1000)
    # send the question
    update_obj.message.reply_text(f"Calculate {context.user_data['rand_x']}+{context.user_data['rand_y']}")

# in the WELCOME state, check if the user wants to answer a question
def welcome(update_obj, context):
    if update_obj.message.text.lower() in ['yes', 'y']:
        # send question, and go to the QUESTION state
        randomize_numbers(update_obj, context)
        return QUESTION
    else:
        # go to the CANCEL state
        return CANCEL

# in the QUESTION state
def question(update_obj, context):
    # expected solution
    solution = int(context.user_data['rand_x']) + int(context.user_data['rand_y'])
    # check if the solution was correct
    if solution == int(update_obj.message.text):
        # correct answer, ask the user if he found tutorial helpful, and go to the CORRECT state
        update_obj.message.reply_text("Correct answer!")
        update_obj.message.reply_text("Was this tutorial helpful to you?")
        return CORRECT
    else:
        # wrong answer, reply, send a new question, and loop on the QUESTION state
        update_obj.message.reply_text("Wrong answer :'(")
        # send another random numbers calculation
        randomize_numbers(update_obj, context)
        return QUESTION

# in the CORRECT state
def correct(update_obj, context):
    if update_obj.message.text.lower() in ['yes', 'y']:
        update_obj.message.reply_text("Glad it was useful! ^^")
    else:
        update_obj.message.reply_text("You must be a programming wizard already!")
    # get the user's first name
    first_name = update_obj.message.from_user['first_name']
    update_obj.message.reply_text(f"See you {first_name}!, bye")
    return telegram.ext.ConversationHandler.END

def cancel(update_obj, context):
    # get the user's first name
    first_name = update_obj.message.from_user['first_name']
    update_obj.message.reply_text(
        f"Okay, no question for you then, take care, {first_name}!", reply_markup=telegram.ReplyKeyboardRemove()
    )
return telegram.ext.ConversationHandler.END每个函数都代表一个状态,现在我们定义了处理程序,让我们将它们添加到我们的调度程序中,创建一个ConversationHandler:
# a regular expression that matches yes or no
yes_no_regex = re.compile(r'^(yes|no|y|n)$', re.IGNORECASE)
# Create our ConversationHandler, with only one state
handler = telegram.ext.ConversationHandler(
      entry_points=[telegram.ext.CommandHandler('start', start)],
      states={
            WELCOME: [telegram.ext.MessageHandler(telegram.ext.Filters.regex(yes_no_regex), welcome)],
            QUESTION: [telegram.ext.MessageHandler(telegram.ext.Filters.regex(r'^\d+$'), question)],
            CANCEL: [telegram.ext.MessageHandler(telegram.ext.Filters.regex(yes_no_regex), cancel)],
            CORRECT: [telegram.ext.MessageHandler(telegram.ext.Filters.regex(yes_no_regex), correct)],
      },
      fallbacks=[telegram.ext.CommandHandler('cancel', cancel)],
      )
# add the handler to the dispatcher
dispatcher.add_handler(handler)Python制作电报机器人实例:ConversationHandler是一个处理对话的对象,它的定义很简单,我们只是通过为启动命令提供一个 CommandHandler 来指定开始的状态。
对于其他状态,我们MessageHandler为每个状态创建一个,它需要两个参数;一个正则表达式过滤器,描述用户输入应该是什么样子才能到达每个状态,以及之前定义的函数(处理程序)。
如何用Python制作电报机器人?现在,我们可以等待与用户通信,我们只需要调用这两个方法:
# start polling for updates from Telegram
updater.start_polling()
# block until a signal (like one sent by CTRL+C) is sent
updater.idle()
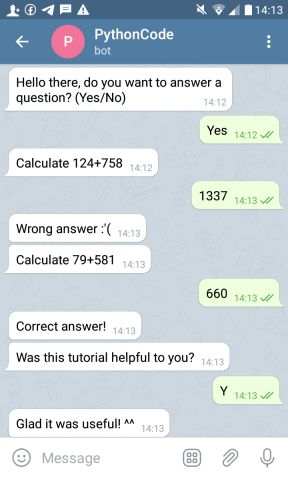
回到 Telegram 应用程序,让我们测试我们的机器人:
请注意,你可以使用/start命令开始对话。
结论
Python如何制作电报机器人?Telegram 为开发人员提供了一个非常方便的 API,允许他们将其使用扩展到端到端通信之外,我们已经通过本教程看到了如何使用它来实现具有多个状态的机器人。
我建议你详细了解它提供的 API 功能、如何处理用户发送的图像和文件、付款等。
编写 Telegram 机器人很有趣,不是吗?想象一下,如果我们将这个强大的 API 与自然语言处理和 AI结合起来打造一个问答聊天机器人,那就太棒了。


