TensorFlow和迁移学习实现图像分类:了解什么是迁移学习以及如何使用预训练的 MobileNet 模型来获得更好的性能,以及Python图像分类示例,以便在 Python 中使用 TensorFlow 对花卉进行分类。
Python如何实现图像分类?在现实世界中,这是罕见的训练Convolutional Neural Network(CNN),因为它是很难收集了大规模的数据集,以获得更好的性能。相反,通常在非常大的数据集上使用预先训练的网络并针对你的分类问题对其进行调整,这个过程称为迁移学习。
什么是迁移学习
它是一种机器学习方法,其中模型在可以针对另一任务进行训练(或调整)的任务上进行训练,现在非常流行,尤其是在计算机视觉和自然语言处理问题中。鉴于训练深度学习模型所需的大量资源,迁移学习非常方便。以下是迁移学习最重要的好处:
- 加快训练时间。
- 它需要更少的数据。
- 使用由深度学习专家开发的最先进的模型。
由于这些原因,最好将迁移学习用于图像分类问题,而不是从头开始创建模型和训练,ResNet、InceptionV3、Xception和MobileNet等模型在名为ImageNet的海量数据集上进行训练,该数据集包含超过 1400 万个对 1000 个不同对象进行分类的图像。
相关: 如何在 Python 中使用 OpenCV 和 PyTorch 执行 YOLO 对象检测。
加载和准备数据集
Python如何实现图像分类?我们将使用花卉照片数据集,其中包含 5 种花卉(雏菊、蒲公英、玫瑰、向日葵和郁金香)。
通过以下命令安装所有内容后:
pip3 install tensorflow numpy matplotlib打开一个新的 Python 文件并导入必要的模块:
import tensorflow as tf
from tensorflow.keras.models import Model
from tensorflow.keras.applications import MobileNetV2, ResNet50, InceptionV3 # try to use them and see which is better
from tensorflow.keras.layers import Dense
from tensorflow.keras.callbacks import ModelCheckpoint, TensorBoard
from tensorflow.keras.utils import get_file
from tensorflow.keras.preprocessing.image import ImageDataGenerator
import os
import pathlib
import numpy as np
数据集的图像大小不一致,因此,我们需要将所有图像的大小调整为 MobileNet(我们将使用的模型)可接受的形状:
batch_size = 32
# 5 types of flowers
num_classes = 5
# training for 10 epochs
epochs = 10
# size of each image
IMAGE_SHAPE = (224, 224, 3)
让我们加载数据集:
def load_data():
    """This function downloads, extracts, loads, normalizes and one-hot encodes Flower Photos dataset"""
    # download the dataset and extract it
    data_dir = get_file(origin='https://storage.googleapis.com/download.tensorflow.org/example_images/flower_photos.tgz',
                                         fname='flower_photos', untar=True)
    data_dir = pathlib.Path(data_dir)
    # count how many images are there
    image_count = len(list(data_dir.glob('*/*.jpg')))
    print("Number of images:", image_count)
    # get all classes for this dataset (types of flowers) excluding LICENSE file
    CLASS_NAMES = np.array([item.name for item in data_dir.glob('*') if item.name != "LICENSE.txt"])
    # roses = list(data_dir.glob('roses/*'))
    # 20% validation set 80% training set
    image_generator = ImageDataGenerator(rescale=1/255, validation_split=0.2)
    # make the training dataset generator
    train_data_gen = image_generator.flow_from_directory(directory=str(data_dir), batch_size=batch_size,
                                                        classes=list(CLASS_NAMES), target_size=(IMAGE_SHAPE[0], IMAGE_SHAPE[1]),
                                                        shuffle=True, subset="training")
    # make the validation dataset generator
    test_data_gen = image_generator.flow_from_directory(directory=str(data_dir), batch_size=batch_size,
                                                        classes=list(CLASS_NAMES), target_size=(IMAGE_SHAPE[0], IMAGE_SHAPE[1]),
                                                        shuffle=True, subset="validation")
    return train_data_gen, test_data_gen, CLASS_NAMES
TensorFlow和迁移学习实现图像分类:上述函数下载并提取数据集,然后使用ImageDataGenerator Keras 实用程序类将数据集包装在 Python 生成器中(因此图像仅分批加载到内存中,而不是一次性加载)。
之后,我们将图像缩放并调整为固定形状,然后将数据集分成 80% 用于训练和 20% 用于验证。
我还鼓励你更改此函数以使用tf.dataAPI,该数据集已经在 Tensorflow 数据集中,你可以像我们在本教程中所做的那样加载它。
构建模型
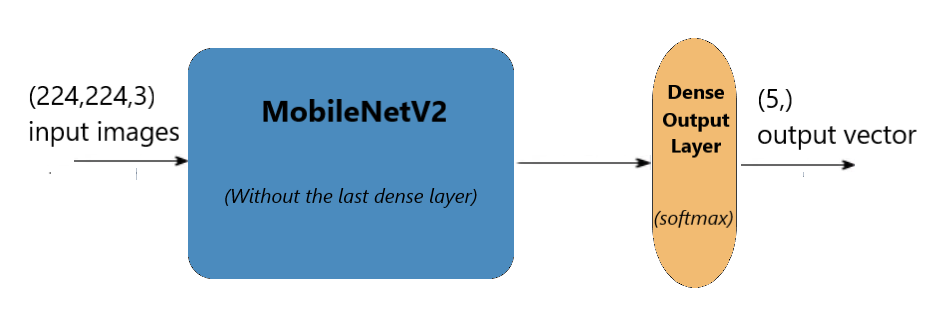
Python图像分类示例:我们将使用MobileNetV2模型,它不是一个很重的模型,但在训练和测试过程中做得很好。如前所述,该模型经过训练可以对 1000 个不同的对象进行分类,我们需要一种方法来调整该模型,使其仅适用于我们的花卉分类。因此,我们将删除最后一个全连接层,并添加我们自己的由 5 个单元组成的具有 softmax 激活函数的最后一层:
def create_model(input_shape):
    # load MobileNetV2
    model = MobileNetV2(input_shape=input_shape)
    # remove the last fully connected layer
    model.layers.pop()
    # freeze all the weights of the model except the last 4 layers
    for layer in model.layers[:-4]:
        layer.trainable = False
    # construct our own fully connected layer for classification
    output = Dense(num_classes, activation="softmax")
    # connect that dense layer to the model
    output = output(model.layers[-1].output)
    model = Model(inputs=model.inputs, outputs=output)
    # print the summary of the model architecture
    model.summary()
    # training the model using adam optimizer
    model.compile(loss="categorical_crossentropy", optimizer="adam", metrics=["accuracy"])
    return model
上述函数将首先下载模型权重(如果不可用),然后删除最后一层。
之后,我们冻结最后一层,因为它是预训练的,我们不想修改这些权重。然而,重新训练最后一个卷积层是一个很好的做法,因为这个数据集与原始 ImageNet 数据集非常相似,所以我们不会破坏权重(那么多)。
最后,我们构建了自己的由五个神经元组成的密集层,并将其连接到 MobileNetV2 模型的最后一层。下图展示了该架构:
请注意,你可以使用 TensorFlow hub 非常轻松地加载此模型,请查看此链接以使用他们的代码片段来创建模型。
训练模型
Python如何实现图像分类?让我们使用以上两个函数开始训练:
if __name__ == "__main__":
    # load the data generators
    train_generator, validation_generator, class_names = load_data()
    # constructs the model
    model = create_model(input_shape=IMAGE_SHAPE)
    # model name
    model_name = "MobileNetV2_finetune_last5"
    # some nice callbacks
    tensorboard = TensorBoard(log_dir=os.path.join("logs", model_name))
    checkpoint = ModelCheckpoint(os.path.join("results", f"{model_name}" + "-loss-{val_loss:.2f}.h5"),
                                save_best_only=True,
                                verbose=1)
    # make sure results folder exist
    if not os.path.isdir("results"):
        os.mkdir("results")
    # count number of steps per epoch
    training_steps_per_epoch = np.ceil(train_generator.samples / batch_size)
    validation_steps_per_epoch = np.ceil(validation_generator.samples / batch_size)
    # train using the generators
    model.fit_generator(train_generator, steps_per_epoch=training_steps_per_epoch,
                        validation_data=validation_generator, validation_steps=validation_steps_per_epoch,
                        epochs=epochs, verbose=1, callbacks=[tensorboard, checkpoint])
这里没什么特别的,加载数据,构建模型,然后使用一些回调来跟踪和保存最佳模型。
一旦执行脚本,训练过程就开始了,你会注意到并非所有权重都在训练:
Total params: 2,264,389
Trainable params: 418,565
Non-trainable params: 1,845,824
这将需要几分钟时间,具体取决于你的硬件。
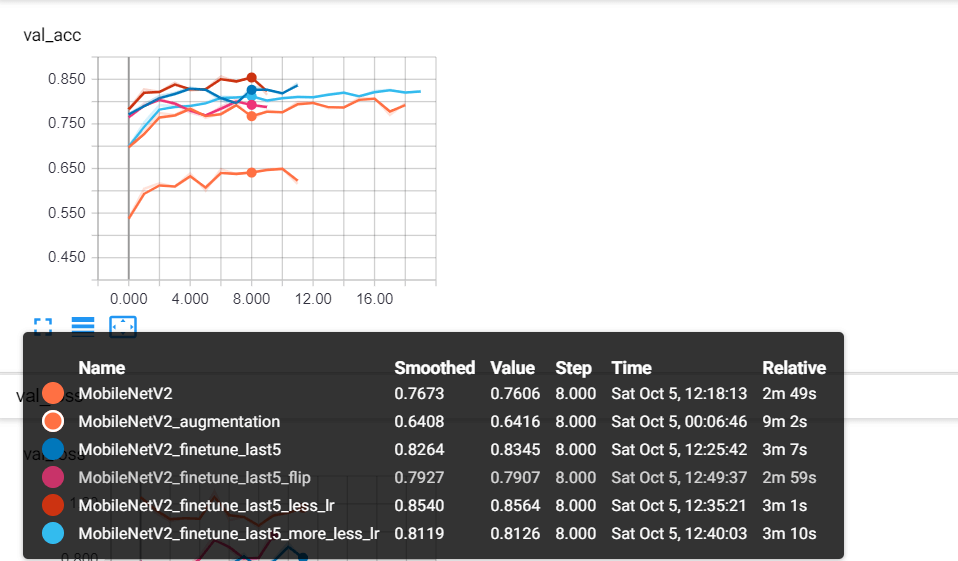
TensorFlow和迁移学习实现图像分类 - 我使用tensorboard进行了一些实验,例如,我尝试冻结除最后一个分类层之外的所有权重,降低优化器学习率,使用一些图像翻转,缩放和一般增强,这是一个截图:

MobileNetV2是我冻结所有权重的模型(当然最后 5 个单位密集层除外)。MobileNetV2_augmentation使用一些图像增强。MobileNetV2_finetune_last5我们现在使用的模型不会冻结MobileNetV2 模型的最后 4 层。MobileNetV2_finetune_last5_less_lr以近 86% 的准确率占据主导地位,这是因为一旦你不冻结训练过的权重,你就需要降低学习率,以便你可以慢慢调整数据集的权重。这是一个具有0.0005 学习率的Adam优化器。
注意:要修改学习率,你可以Adam 从keras.optimizers包中导入优化器,然后使用optimizer=Adam(lr=0.0005)参数编译模型。
测试模型
Python图像分类示例:现在要评估我们的模型,我们需要通过该model.load_weights()方法加载最佳权重,你需要选择具有最小损失值的权重,在我的情况下,损失为0.63:
# load the data generators
train_generator, validation_generator, class_names = load_data()
# constructs the model
model = create_model(input_shape=IMAGE_SHAPE)
# load the optimal weights
model.load_weights("results/MobileNetV2_finetune_last5-loss-0.63.h5")
validation_steps_per_epoch = np.ceil(validation_generator.samples / batch_size)
# print the validation loss & accuracy
evaluation = model.evaluate_generator(validation_generator, steps=validation_steps_per_epoch, verbose=1)
print("Val loss:", evaluation[0])
print("Val Accuracy:", evaluation[1])
确保使用最佳权重,即损失较低且准确度较高的权重。
输出:
23/23 [==============================] - 4s 178ms/step - loss: 0.6338 - accuracy: 0.8140
Val loss: 0.6337507224601248
Val Accuracy: 0.81395346
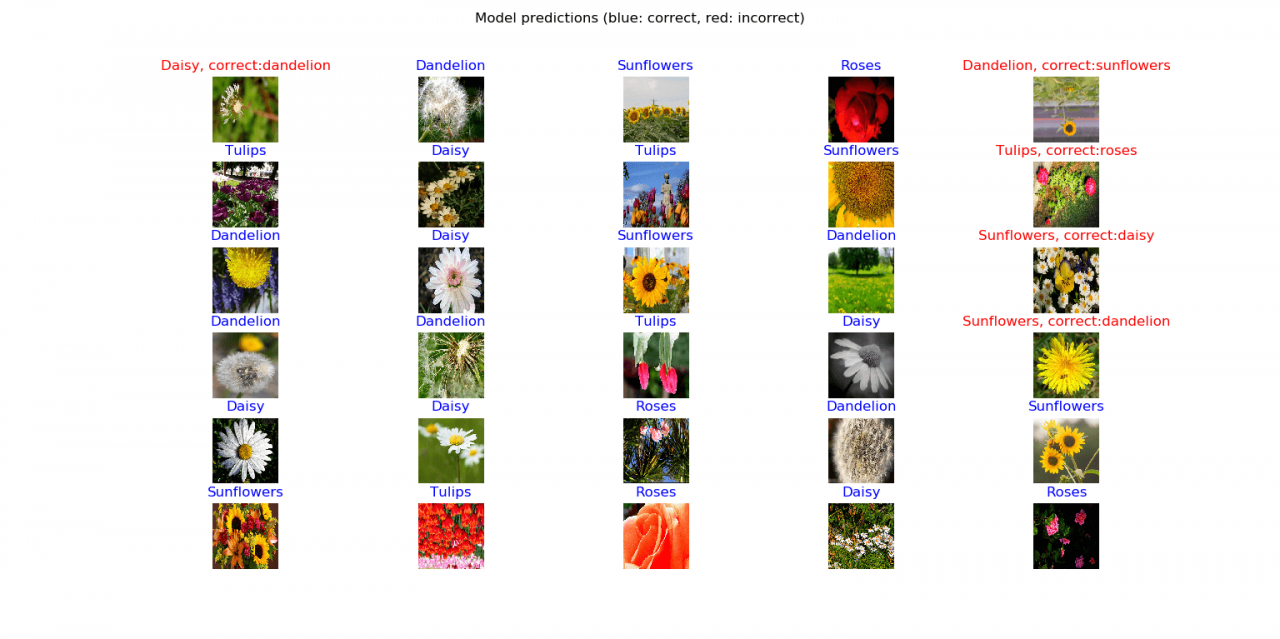
Python如何实现图像分类?好的,让我们稍微想象一下,我们将绘制一整批带有相应预测和正确标签的图像:
# get a random batch of images
image_batch, label_batch = next(iter(validation_generator))
# turn the original labels into human-readable text
label_batch = [class_names[np.argmax(label_batch[i])] for i in range(batch_size)]
# predict the images on the model
predicted_class_names = model.predict(image_batch)
predicted_ids = [np.argmax(predicted_class_names[i]) for i in range(batch_size)]
# turn the predicted vectors to human readable labels
predicted_class_names = np.array([class_names[id] for id in predicted_ids])
# some nice plotting
plt.figure(figsize=(10,9))
for n in range(30):
    plt.subplot(6,5,n+1)
    plt.subplots_adjust(hspace = 0.3)
    plt.imshow(image_batch[n])
    if predicted_class_names[n] == label_batch[n]:
        color = "blue"
        title = predicted_class_names[n].title()
    else:
        color = "red"
        title = f"{predicted_class_names[n].title()}, correct:{label_batch[n]}"
    plt.title(title, color=color)
    plt.axis('off')
_ = plt.suptitle("Model predictions (blue: correct, red: incorrect)")
plt.show()
一旦你运行它,你会得到这样的东西:

惊人的!如你所见,在 30 张图像中,有 25 张被正确预测,不过这是一个很好的结果,因为有些花图像有点模糊。
结论
好吧,就是这样。在本TensorFlow和迁移学习实现图像分类教程中,你了解了如何使用迁移学习在 Python 中使用 Tensorflow 和 Keras 快速开发和使用最先进的模型。
我强烈建议你使用上面提到的其他模型,也尝试对它们进行微调,祝你好运!

