Node.js的" fs"模块实现了文件I / O操作。 fs模块中的方法可以是同步的, 也可以是异步的。异步函数具有作为最后一个参数的回调函数, 该参数指示异步函数的完成。与异步方法相比, Node.js开发人员更喜欢异步方法, 因为异步方法在执行过程中从不阻塞程序, 而后者则不会。阻塞主线程是Node.js中的不当行为, 因此同步功能应仅用于调试或在没有其他选项可用时使用。 fs.writeFileSync()是一种同步方法。如果指定的文件不存在, 则fs.writeFileSync()将创建一个新文件。此外, " readline-sync"模块用于在运行时启用用户输入。
语法如下:
fs.writeFileSync( file, data, options )参数:此方法接受上述和以下所述的三个参数:
- 文件:它是一个字符串, Buffer, URL或文件描述整数, 表示必须在其中写入文件的路径。使用文件描述符将使其行为类似于fs.write()方法。
- 数据:它是将写入文件的字符串, Buffer, TypedArray或DataView。
- 选项:它是一个字符串或对象, 可用于指定将影响输出的可选参数。它具有三个可选参数:
- 编码:它是一个字符串, 它指定文件的编码。默认值为" utf8"。
- 模式:它是一个整数, 指定文件模式。默认值为0o666。
- flag:它是一个字符串, 指定在写入文件时使用的标志。默认值为" w"。
以下示例说明了fs.writeFileSync()方法在Node.js中:
范例1:
// Node.js program to demonstrate the
// fs.writeFileSync() method

// Import the filesystem module
const fs = require( 'fs' );

let data = "This is a file containing a collection"
            + " of programming languages.\n"
  + "1. C\n2. C++\n3. Python" ;

fs.writeFileSync( "programming.txt" , data);
console.log( "File written successfully\n" );
console.log( "The written has the following contents:" );
console.log(fs.readFileSync( "programming.txt" , "utf8" ));
输出如下:
File written successfully

The written has the following contents:
This is a file containing a collection of programming languages.
1. C
2. C++
3. Python
范例2:
// Node.js program to demonstrate the
// fs.writeFileSync() method

// Import the filesystem module
const fs = require( 'fs' );

// Writing to the file 5 times
// with the append file mode
for (let i = 0; i < 5; i++) {
   fs.writeFileSync( "movies.txt" , "Movie " + i + "\n" , {
       encoding: "utf8" , flag: "a+" , mode: 0o666
     });
}

console.log( "File written successfully 5 times\n" );
console.log( "The written file has the following contents:" );
console.log(fs.readFileSync( "movies.txt" , "utf8" ));
输出如下:
File written successfully 5 times

The written file has the following contents:
Movie 0
Movie 1
Movie 2
Movie 3
Movie 4
参考: https://nodejs.org/api/fs.html#fs_fs_writefilesync_file_data_options
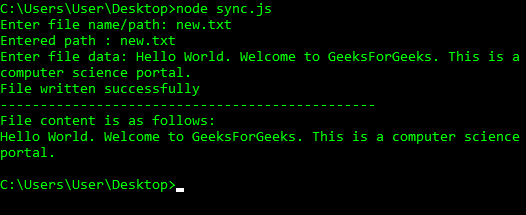
范例3:使用readline模块从用户获取运行时输入的文件名和文件数据
// Write Javascript code here
var readline = require( 'readline-sync' );
var fs = require( "fs" );

var path = readline.question( "Enter file name/path: " );

console.log( "Entered path : " + path);

var data = readline.question( "Enter file data: " );

//synchronous functions may throw errors
//which can be handled using try-catch block
try {
   fs.writeFileSync(path, data, {flag: 'a+' });   //'a+' is append mode
   console.log( "File written successfully" );
} catch (err) {
   console.error(err);
}
console.log( "-----------------------------------------------" );
try {
const data = fs.readFileSync(path, {encoding: "utf8" });
   console.log( "File content is as follows:" );
   // Display the file data
   console.log(data);
} catch (err){
console.log(err);
}
输出如下

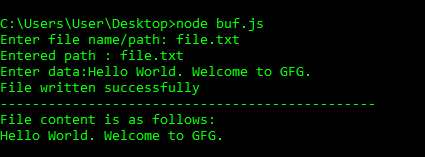
范例4:使用缓冲区使用readline模块从用户获取运行时输入的文件数据
// Write Javascript code here
var fs = require( "fs" );
var readline = require( 'readline-sync' );
var path = readline.question( "Enter file name/path: " );

console.log( "Entered path : " + path);
// 1024 specifies the buffer size. We can limit
// the data size by this approach
var buf = new Buffer.alloc(1024);
buf = readline.question( "Enter data:" );


try {
   fs.writeFileSync(path, buf, {flag: 'a+' });
   console.log( "File written successfully" );
} catch (err) {
   console.error(err);
}
console.log( "-----------------------------------------------" );
try {
const data = fs.readFileSync(path, {encoding: "utf8" });
   console.log( "File content is as follows:" );
   // Display the file data
   console.log(data);
} catch (err){
console.log(err);
}
输出如下


