Kivy是Python中与平台无关的GUI工具。由于它可以在Android, IOS, Linux和Windows等操作系统上运行。它基本上是用于开发Android应用程序, 但这并不意味着它不能在桌面应用程序上使用。
Kivy教程–通过示例学习Kivy。
相对布局:
- 相对布局与FloatLayout区别在于其子窗口小部件相对于布局定位。
- 此布局的操作方式与FloatLayout相同, 但是定位属性(x, y, center_x, right, y, center_y和top)是相对于Layout大小而不是窗口大小的。
- 实际上, 无论绝对位置和相对位置如何, 当布局的位置更改时, 小部件都会移动。
- 将position =(0, 0)的窗口小部件添加到RelativeLayout时, 现在如果RelativeLayout的位置发生了更改, 则子窗口小部件也将移动。子窗口小部件坐标保持不变, 即(0, 0), 因为它们始终相对于父布局。
- 可用的pos_hint键(x, center_x, right, y, center_y和top)对于对齐边缘或居中很有用。
例如:
pos_hint:{'center_x':。5, 'center_y':。5}会将窗口小部件对齐在中间, 而不管窗口的大小如何。
使用RelativeLayout要做的第一件事是导入它。
from kivy.uix.relativelayout import RelativeLayout注意:
此布局允许你设置子项的相对坐标。如果要绝对定位, 请使用FloatLayout。在RelativeLayout中, 必须指定每个子窗口小部件的大小和位置。这也可以进行动态放置。
We can do relative positioning by:
pos_hint: provide hint of position
We can define upto 8 keys i.e. it takes arguments in form of dictionary.
pos_hint = {"x":1, "y":1, "left":1, "right":1, "center_x":1, "center_y":1, "top":1, "bottom":1("top":0)}
注意:
浮动布局
和
相对布局
两者都支持绝对和相对定位, 具体取决于是否
pos_hint
或pos使用。但是, 如果要绝对定位, 请使用FloatLayout。
Basic Approach to create Relative Layout:

1) import kivy
2) import kivyApp
3) import button
4) import Relativelayout
5) Set minimum version(optional)
6) create App class:
        - define build() function
7) return Layout/widget/Class(according to requirement)
8) Run an instance of the class
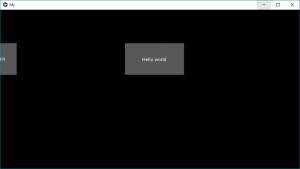
使用pos的方法的实现:
它只是将位置分配给按钮。如
相对布局
不依赖于窗口大小, 如果你将窗口大小设置得很小, 它现在会固定在该位置, 它可能会消失而不是自行调整。
# Sample Python application demonstrating the
# working of RelativeLayout in Kivy

# import modules
import kivy

# base Class of your App inherits from the App class.
# app:always refers to the instance of your application
from kivy.app import App

# creates the button in kivy
# if not imported shows the error
from kivy.uix.button import Button

# This layout allows you to set relative coordinates for children.
from kivy.uix.relativelayout import RelativeLayout

# To change the kivy default settings
# we use this module config
from kivy.config import Config

# 0 being off 1 being on as in true / false
# you can use 0 or 1 && True or False
Config. set ( 'graphics' , 'resizable' , True )

# creating the App class
class MyApp(App):

     def build( self ):

         # creating Relativelayout
         Rl = RelativeLayout()

         # creating button
         # a button 30 % of the width and 20 %
         # of the height of the layout and
         # positioned at (x, y), you can do
         # The position does not depend on window size
         # it just positioned at the given places:
         btn = Button(text = 'Hello world' , size_hint = (. 2 , . 2 ), pos = ( 396.0 , 298.0 ))
         btn1 = Button(text = 'Hello world !!!!!!!!!' , size_hint = (. 2 , . 2 ), pos = ( - 137.33 , 298.0 ))

         # adding widget i.e button
         Rl.add_widget(btn)
         Rl.add_widget(btn1)

         # return the layout
         return Rl

# run the App
if __name__ = = "__main__" :
     MyApp().run()
输出如下:

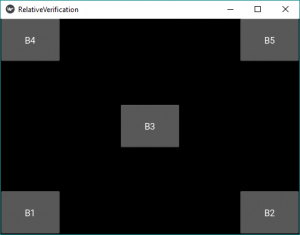
现在, 如果你希望按钮根据窗口进行调整pos_hint用来。
使用pos_hint的实现方法
# Sample Python application demonstrating the
# working of RelativeLayout in Kivy

# import modules
import kivy

# base Class of your App inherits from the App class.
# app:always refers to the instance of your application
from kivy.app import App

# creates the button in kivy
# if not imported shows the error
from kivy.uix.button import Button

# This layout allows you to set relative coordinates for children.
from kivy.uix.relativelayout import RelativeLayout

# To change the kivy default settings
# we use this module config
from kivy.config import Config

# 0 being off 1 being on as in true / false
# you can use 0 or 1 && True or False
Config. set ( 'graphics' , 'resizable' , True )

# creating the App class
class Relative_Layout(App):

     def build( self ):

         # creating Relativelayout
         rl = RelativeLayout()

         # creating button
         # size of button is 20 % by hight and width of layout
         # position is bottom left i.e x = 0, y = 0
         b1 = Button(size_hint = (. 2 , . 2 ), pos_hint = { 'x' : 0 , 'y' : 0 }, text = "B1" )

         # position is bottom right i.e right = 1, y = 0
         b2 = Button(size_hint = (. 2 , . 2 ), pos_hint = { 'right' : 1 , 'y' : 0 }, text = "B2" )

         b3 = Button(size_hint = (. 2 , . 2 ), pos_hint = { 'center_x' :. 5 , 'center_y' :. 5 }, text = "B3" )

         b4 = Button(size_hint = (. 2 , . 2 ), pos_hint = { 'x' : 0 , 'top' : 1 }, text = "B4" )

         b5 = Button(size_hint = (. 2 , . 2 ), pos_hint = { 'right' : 1 , 'top' : 1 }, text = "B5" )


         # adding button to widget
         rl.add_widget(b1)
         rl.add_widget(b2)
         rl.add_widget(b3)
         rl.add_widget(b4)
         rl.add_widget(b5)


         # returning widget
         return rl
# run the App
if __name__  = = "__main__" :
     Relative_Layout().run()
输出如下:

首先, 你的面试准备可通过以下方式增强你的数据结构概念:Python DS课程。

